As you drive the same streets everyday, you know your local streets by name, and where they go to. But did you ever wonder how the streets in your local area came to be the way they are?
The author, Shaun Strahm did, in his local area of Fullerton California. He wanted to know 1) where all the streets came from, and 2) where the “real” El Camino Real went. That is what this blog is about.
CONTENTS
Introduction
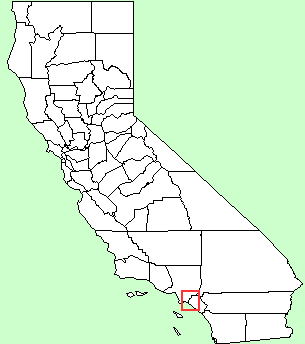
Coverage Area
The History of the Land
Native People Period
Spanish Period 1697-1821
Mission San Gabriel Arcángel
Spanish Ranchos
Mexican Period 1821-1846
Red Hill
Rancho Los Coyotes
Rancho Santa Gertrudes
Rancho San Juan Cajón de Santa Ana
Rancho Santiago de Santa Ana
Rancho Paso de Bartolo
Rancho Cañada de La Habra
Rancho San Joaquin
Rancho Los Alamitos
Other Mexican Ranchos
American Period 1846-on
Newport Boulevard
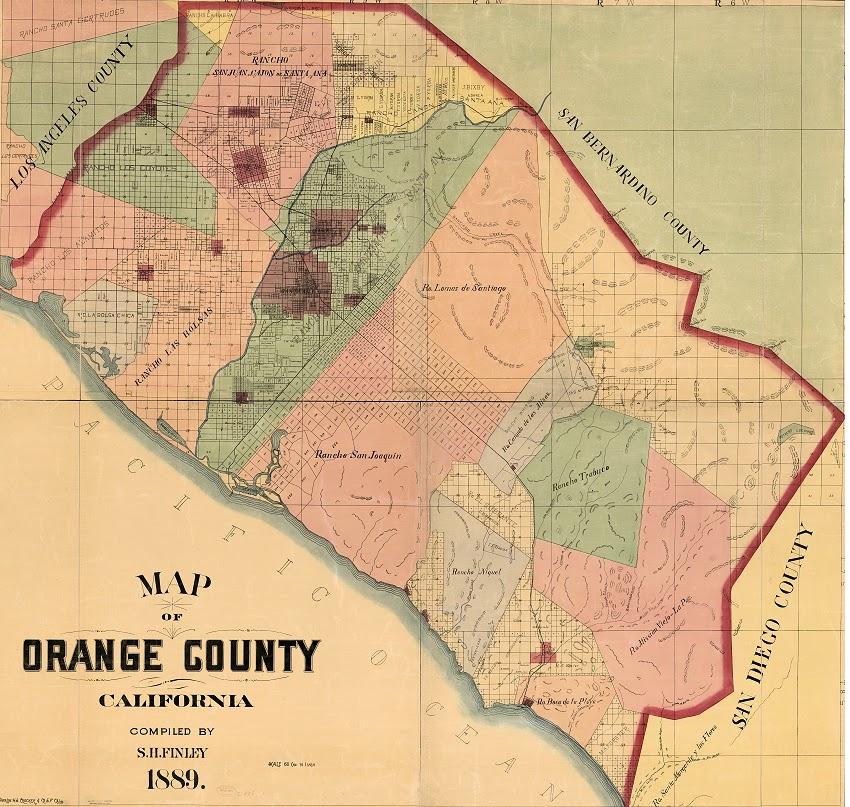
1889 Finley Map of Orange County
Anaheim
Anaheim Transportation
The Oldest Maps
Kirkman 1860 Map of L.A. County
One Mile Square Grid
1870 Stearn’s Ranchos Map
Garden Grove Boulevard
1873 Stearn’s Ranchos Map
The Horse-Drawn Wagon Roads
Railroads Revolutionize Transportation
1915 Auto Club Map
(coverage area added)
The Oldest Maps Combined
Myron’s 1860 All-In-One Topographic Map
Old Roads on the Map
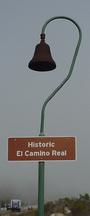
El Camino Real (viejo)
El Camino Real (nuevo)
El Camino Real (nuevo abajo)
Spanish Period Roads
Other Early Roads
Stage Routes
Introduction
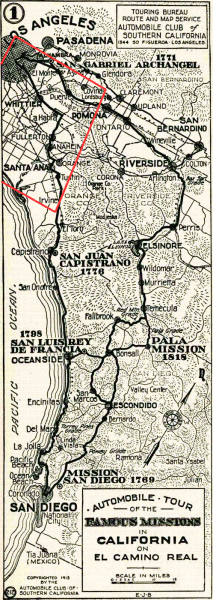
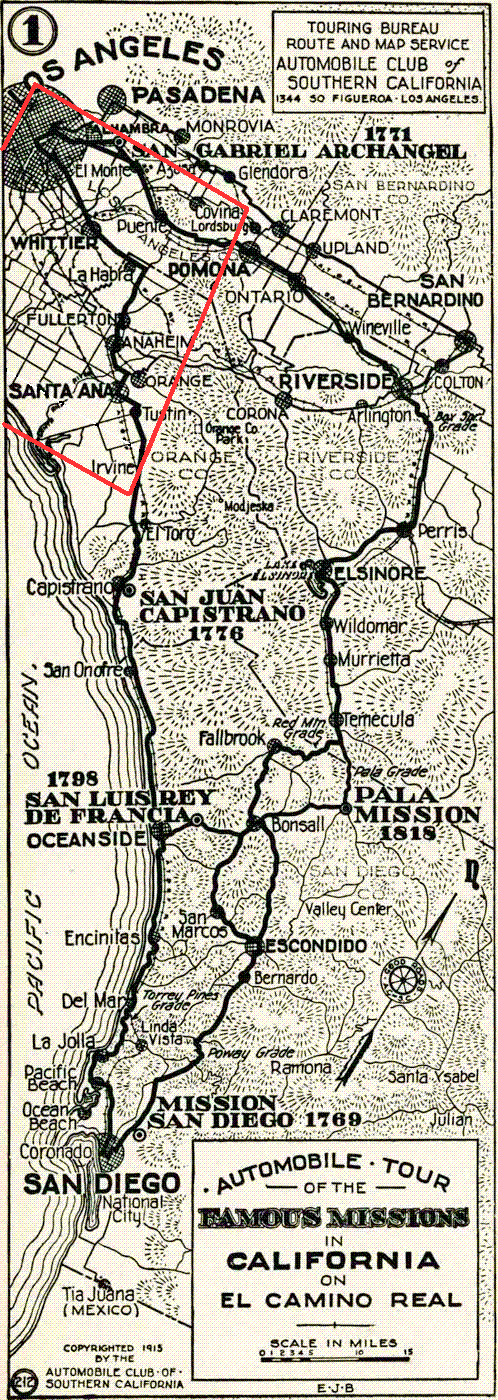
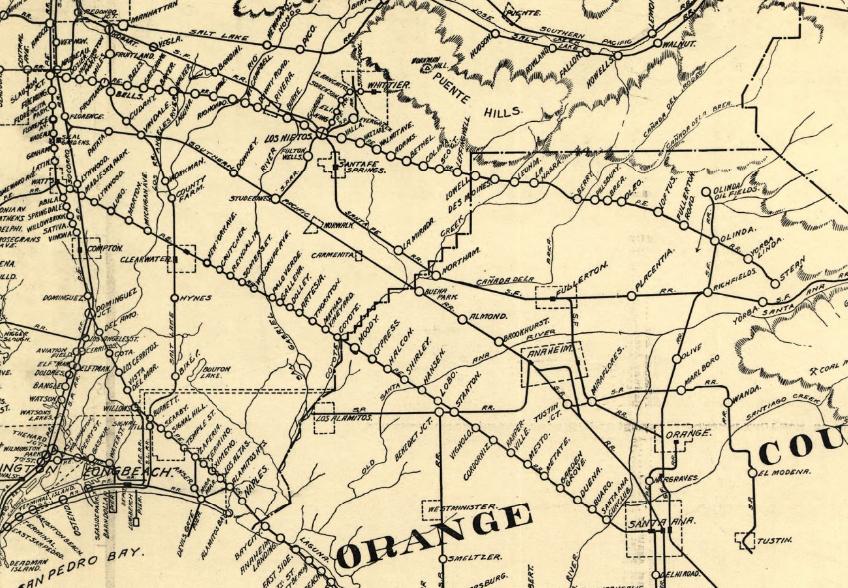
There are several different possible routes through the coverage area, north Orange County and southeast Los Angeles County, for the early mission road. There are also many places that claim to be on the El Camino Real. Since the early 1900’s the romance of the Spanish missions and trails have been used to attract visitors to places or customers to products. There are many historic maps that approximate the route. At right is one, that uses the nearest automobile road of the day, to make a glamorous automobile tour. In general, the actual trail never went due north or due west. It was always at some angle, generally northwest.
In order to understand the places names on early maps, much other information had to be gathered, especially names of places and land owners, families, and dates. Old adobe home sites are called by different names on different maps, depending on who owned them at the time. The early Spanish maps were distorted because they did not use observation balloons, instead they paced off distances and measured angles. So several historic maps had to be combined to reduce omissions or distortions.
Here is the history of the Los Angeles to Anaheim area, relating to the layout of the land.
History of the Land
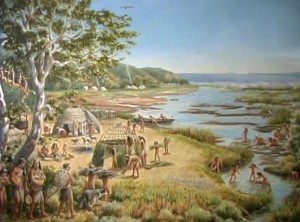
The Tongva people lived in reed huts.
Native People Period
Southern California is believed to have been inhabited by semi-nomadic hunters since 8000 BC. Three thousand years later in 5000 BC, seed and shellfish gatherers lived among large game hunters in this region. By 800 AD, the people of this region had developed a diversified hunting and gathering economy with extensive trade networks, social and political structures, and religious institutions. The descendants of these people are believed to have been those whom the Spaniards of the 1500s encountered and would later name the Gabrielino—derived from Mission San Gabriel—in the late 1700s. See below, the 1860 Map of Los Angeles County that shows dozens of Indian settlements/campsites. Many Indian settlement names became modern city or place names, like Cahuenga, Cucamonga, Topanga, Temescal, Tujunga.
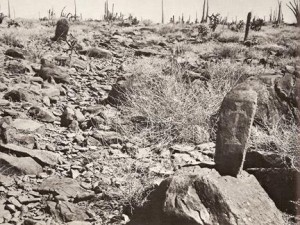
Actual Camino Real in Baja
Spanish Period 1697-1821
Starting in the 1500’s, Spanish ships sailed along the coast of the South and North America, looking for harbors and a short cut back to Europe. From their ships, they made maps and named all of the coastal places after religious figures. Most of the San and Santa place names were established in the 1600’s, as Spain was planning it’s colonization of the Americas.
The first Europeans to walk on California land was the Portola Expedition in 1769, led by Gaspar de Portolá, to look for the best routes and places for missions and settlements. They charted and named the rivers, mountains, and places along the way. The first European settlements in Orange County and southern Los Angeles County were Mission San Gabriel in 1771, Mission San Juan Capistrano in 1776, El Pueblo de Los Angeles in 1781, Rancho Los Nietos in 1795, Santa Ana Viejo (Olive) in 1812, and the Diego Sepúlveda Estancia in 1823.
Old Mission San Gabriel site in Montebello
Mission San Gabriel Arcángel
From Wikipedia: Mission San Gabriel was founded on September 8, 1771 by Father Junipero Serra. The planned site for the Mission was along the banks of the Río de los Temblores (the River of the Earthquakes—the Santa Ana River). The priests chose an alternate site on a fertile plain located directly alongside the Rio Hondo in the Whittier Narrows. The site of the Misión Vieja (or “Old Mission”) is located near the intersection of San Gabriel Boulevard and Lincoln Avenue in Montebello, California (known to the natives as Shevaanga). In 1776, a flash flood destroyed much of the crops and ruined the Mission complex, which was subsequently relocated five miles closer to the mountains in present-day San Gabriel (the native settlement of ‘Iisanchanga). The Mission is the base from which the pueblo that became the city of Los Angeles was sent.
Legend has it that the founding expedition was confronted by a large group of native Tongva peoples whose intention was to drive the strangers away. One of the padres laid a painting of “Our Lady of Sorrows” on the ground for all to see, whereupon the natives, designated by the settlers as the Gabrieliños, immediately made peace with the missionaries, because they were so moved by the painting’s beauty. Today the 300-year-old work hangs in the Mission’s sanctuary.
Spanish Ranchos
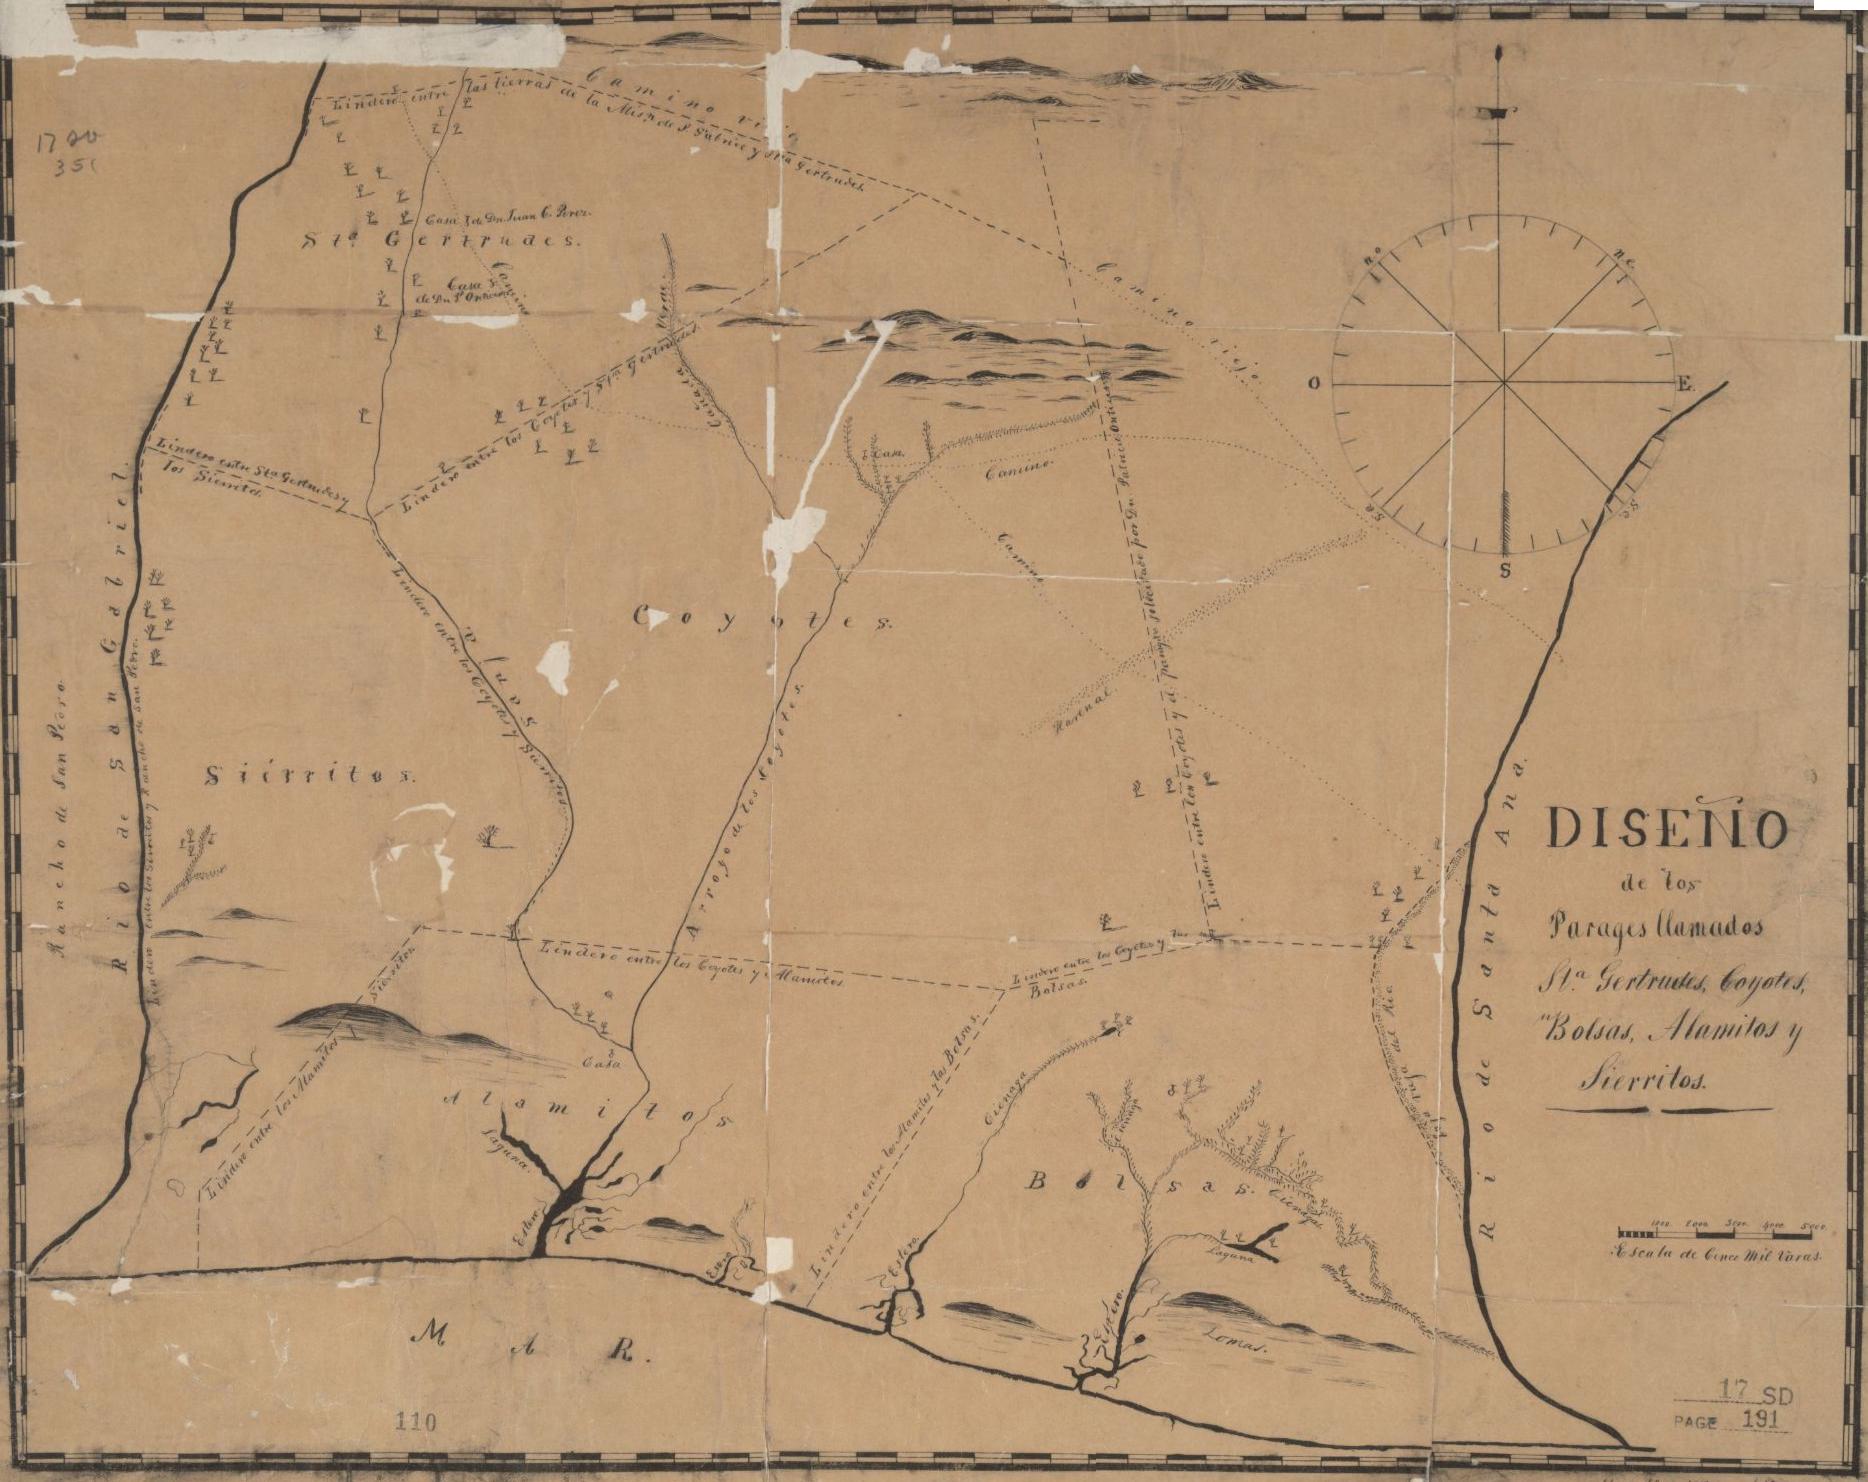
1834 Diseño de los parages llamados (design of the places called) Santa Gertrudes, Coyotes, Bolsas, Alamitos y Sierritos
In 1802, Spanish governor José Joaquín de Arrillaga gave to Juan Pablo Grijalva, a Spanish soldier who was with the De Anza expedition, permission to use the 63,414-acre land known as Rancho Santiago de Santa Ana. Upon Grijalva’s death in 1806, the land passed to his son-in-law, Jose Antonio Yorba and his grandson, Juan Pablo Peralta.
In 1784, Spanish governor Pedro Fages gave to Manuel Nieto, a former sergeant in the Spanish army, and a member of the Portola expedition in 1769, permission to use all of the 167,000 acres of land known as Rancho Los Nietos, between the Santa Ana River and the San Gabriel River, and from present day Whittier to the Pacific Ocean. Neito built an adobe home in 1795 near the Indian village of Sejat, on the San Jose Creek. Upon Manual Neito’s death in 1804, the land passed onto his wife and four children. The flood of 1867-68 destroyed the original home.
The Nieto family operated the cattle ranch until 1834, when Mexican Governer Jose Figueroa officially declared the Rancho Los Nietos land under Mexican rule and ordered its partition into six smaller ranchos. The partitioning of Rancho Los Neitos was done as follows:
Los Alamitos (little poplars), 28,612 acres, to (son) Juan Jose Nieto
Las Bolsas (pockets), 33,460 acres, to Catarina Ruiz (widow of (son) Jose Antonio Nieto)
Los Cerritos (little hills), 27,054 acres, to (daughter) Maria Manuela Nieto de Cota and her husband Guillermo Cota
Los Coyotes (coyotes), 48,806 acres, to (son) Juan Jose Nieto
Santa Gertrudes, 21,298 acres, to Josefa Cota (widow of (son) Antonio Maria Nieto)
Palos Altos (tall woods), not illustrated, unknown acres, to (son) Juan Jose Nieto

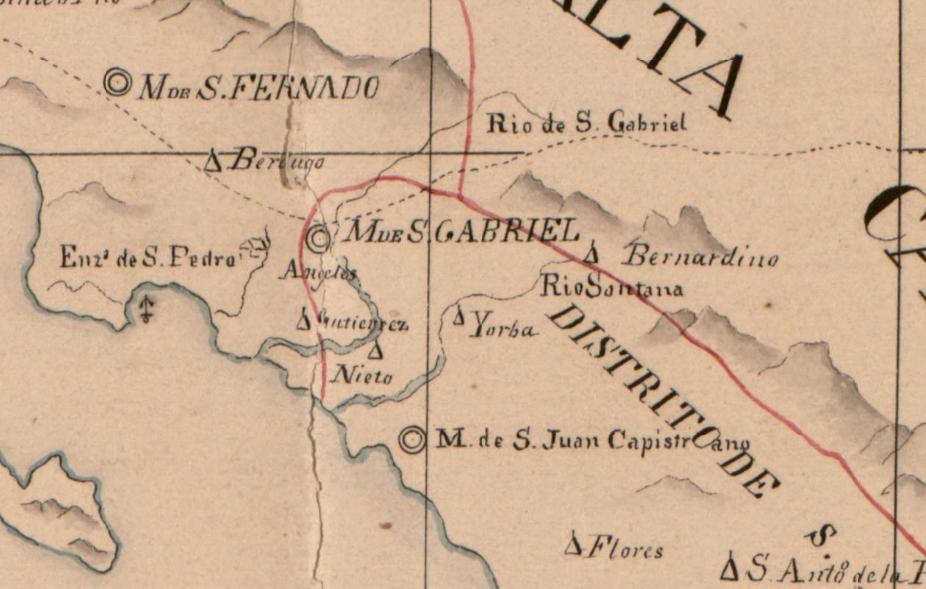
1823 Carta esferica de Alta California
Mexican Period 1821-1846
The first ranchos of Los Angeles and Orange Counties are on the 1823 Carta at right, Berdugo, Bernardino, Flores, Gutierrez, Nieto, Yorba, as well as the missions and pueblos.
There were not many maps made in the Spanish and Mexican periods. The Spanish land surveyors used natural landmarks like rivers, trees, rocky outcrops, or distant mountain peaks as corner points for their property lines. One prominent rocky outcrop is Red Hill, in what is now Tustin. It is the corner of Rancho Santiago de Santa Ana, Rancho San Joaquin, and Rancho Lomas de Santiago. A nearby plaque at 11911 Red Hill Ave commemorates the landmark.
Red Hill
Red Hill was identified on Spanish maps as Serrita de las Ranas (translation: Hill of the Frogs). The original route for El Camino Real ran close to the hill. The landmark peak was used by the Spanish and Mexican explorers traveling up and down the coast. The nearby frogs thrived because of a swampy bog that connected the hill and the back bay in Newport Beach. The bog disappeared with the development of the city of Tustin. The red color results from the mineral cinnabar (mercuric sulfide, HgS, the major source of mercury). Mercury was mined there up into the 1930s. The mines are closed off and the appearance of the hill is preserved as a California historical landmark.
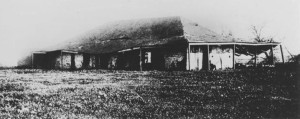
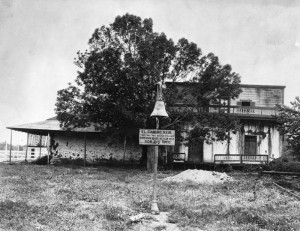
Rancho Los Coyotes headquarters in 1900
Rancho Los Coyotes
In 1840, Juan Jose Nieto sold Rancho Los Coyotes to Juan Bautista Leandry, an Italian immigrant who settled in California in 1827, and was married to Maria Francisca Uribe. They built an adobe house on the hill, in what is now Buena Park, near the south end of Lockhaven Drive. Leandry died in 1842, and his widow, Maria Francisca Uribe, married Francisco O’Campo. Uribe renamed the ranch “La Buena Esperanza” (the good hope) but it was still generally known as Los Coyotes. Rancho Los Coyotes would later become the cities of Buena Park, Cerritos, Cypress, La Mirada, and Stanton.
Rancho Santa Gertrudes
Rancho Santa Gertrudes was a 21,298-acre 1834 Mexican land grant, resulting from a partition of Rancho Los Nietos. It included the former Tongva site known as Nacaugna.
From Wikipedia: At the request of Manuel Nieto heirs, governor José Figueroa in 1834, officially declared the 167,000-acre Rancho Los Nietos grant under Mexican rule and ordered its partition into five smaller ranchos: Las Bolsas, Los Alamitos, Los Cerritos, Los Coyotes, and Santa Gertrudes. Josefa Cota (widow of Antonio Maria Nieto, son of Manuel Nieto) received the Rancho Santa Gertrudes grant. Lemuel Carpenter (1808–1859), who had married Maria de Los Angeles Dominguez, a niece of Josefa Cota, bought the rancho in 1843 from Josefa Cota, his aunt by marriage.
With the cession of California to the United States following the Mexican-American War, the 1848 Treaty of Guadalupe Hidalgo provided that the land grants would be honored. As required by the Land Act of 1851, a claim for part of Rancho Santa Gertrudes was filed Lemuel Carpenter in 1852. Carpenter, who was deeply in debt to John G. Downey, killed himself in 1859. In 1859 the rancho was sold at a sheriff’s auction to John G. Downey and James P. McFarland. 17,602 acres of the grant was patented to McFarland and Downey in 1870. A claim for part of Rancho Santa Gertrudes was filed by Thomas Sanchez Colima with the Public Land Commission in 1852, and 3,696 acres of the grant was patented to Thomas Sanchez Colima in 1877. Rancho Santa Gertrudes would later become the present-day cities of Downey and Santa Fe Springs.
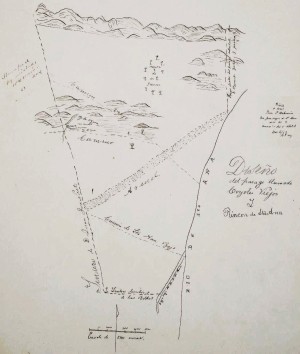
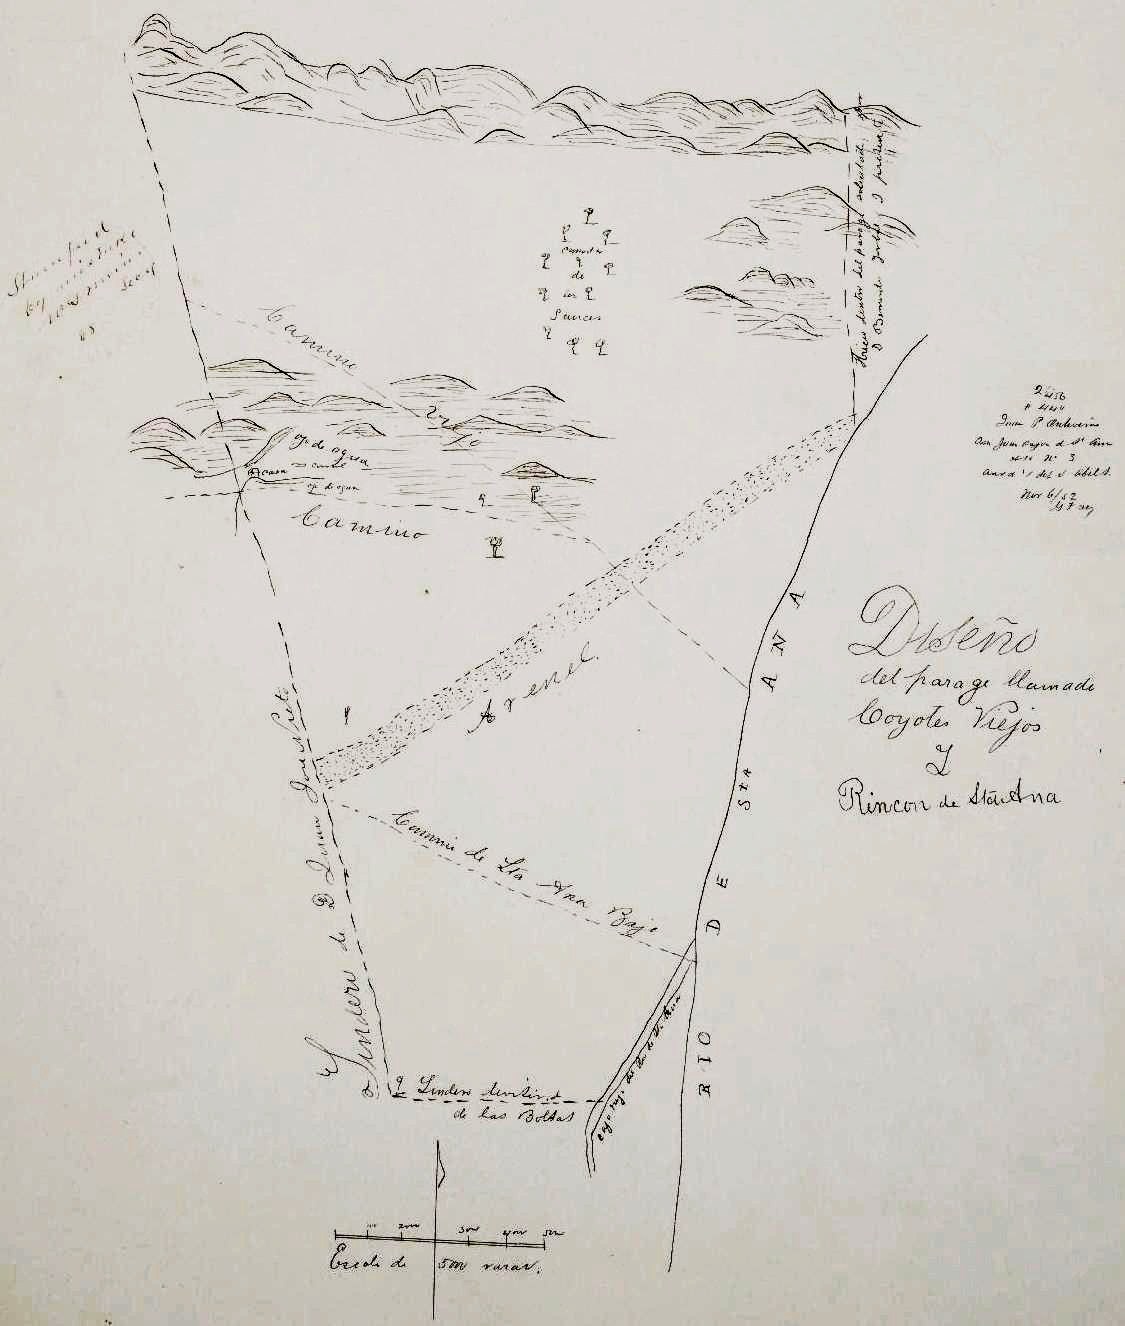
1852 Diseño del parage llamado (design of the place called) Coyotes Viejos y Rincon de Santa Ana
Rancho San Juan Cajón de Santa Ana
East of Rancho Los Coyotes was 35,971 acres of land, granted to Juan Pacifico Ontiveros in 1837, by Mexican Governor Juan B. Alvarado. Ontiveros built an adobe house in 1841, in what is now Placentia, on Crowther Ave and Porter Way. In 1853, Ontiveros sold 21,527 acres to Abel Stearns. In 1855, Ontiveros bought a rancho in present-day northern Santa Barbara County, then built an adobe house and lived there until his death.
In 1857, Ontiveros sold 1,160 acres that would become Anaheim, to George Hansen who was working for 50 German-American families from the San Francisco area. In 1863, Juan Pacifico Ontiveros gave his sons Juan Nicolas Ontiveros and Patricio Ontiveros 3,900 acres of Rancho San Juan Cajón de Santa Ana. At this time, they were both married. Juan Nicolas and Patricio did not keep their share very long, and in 1864, both deeded their share to their brother-in-law, Augustus Langenberger (married Pietra Ontiveros).
In 1865, Daniel Kraemer started the influx of settlers to Placentia in 1865, when he purchased 3,900 acres. Rancho San Juan Cahon de Santa Ana would later become the cities of Anaheim, Brea, Fullerton, and Placentia.
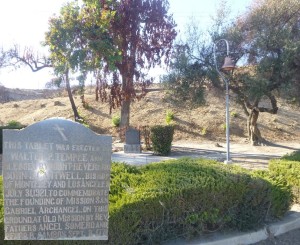
Rancho Santiago de Santa Ana
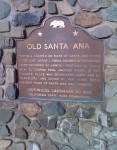
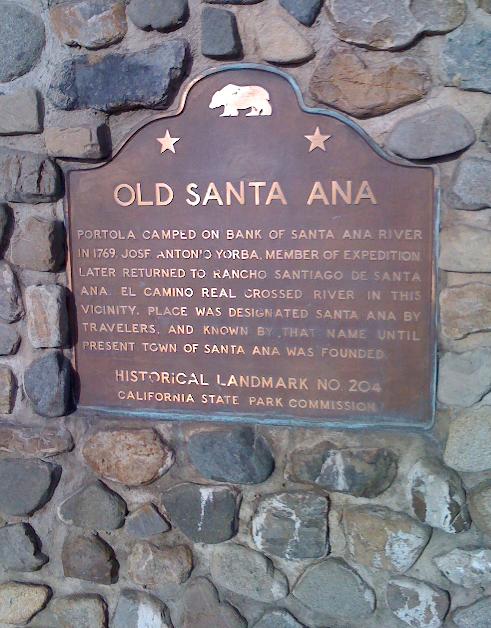
Old Santa Ana
Historical Lamdmark
Juan Pablo Grijalva, a Spanish soldier who traveled to Alta California with the De Anza expedition, was the original petitioner for the 63,414-acre land that became known as the “Rancho Santiago de Santa Ana”, formerly “Rancho Lomas de Santiago”. He died in 1806 before the grant was approved and in 1810 the land went to his son-in-law, Jose Antonio Yorba and his grandson, Juan Pablo Peralta.
Juan Pablo Grijalva built an adobe, in about 1801, one of the first in Orange County, at what is now 1087 N Santiago Blvd in Orange. A few years later and a mile north of there, where the Santa Ana River bends around the Peralta Hills, Juan Pablo Peralta and Jose Antonio Yorba built small adobe homes. Those early adobes were ruins by 1860. A plaque commemorates the site, that was first called “Santa Ana” but later “Old Santa Ana” after the city of Santa Ana was formed in 1869 several miles south. It is also the place where the original Camino Real crossed the Santa Ana River. Jose Antonio Yorba built an elaborate adobe hacienda, El Refugio (the Refuge), located near present-day First and Sullivan Streets in Santa Ana.
After the Mexican Cession of California to the United States, grant was patented to Bernardo, Teodoro and Ramón Yorba in 1853 by Mexican governer Jose Figueroa. Bernardo Yorba built his famous “Hacienda de San Antonio” on the north bank of the Santa Ana River, at what is now Esperanza Rd and Echo Hill Ln in Yorba Linda. The spacious two-story adobe had living quarters, guest rooms, and space for craftsmen, laborers and servants. Ramon Peralta built an adobe at what is now 6398 E Santa Ana Canyon Rd, That is the only adobe in the Santa Ana Canyon still standing today. It has a small museum featuring artifacts excavated at the site, and timeline mural, and other exhibits. In 1854, the Yorba family sold Rancho Santiago de Santa Ana to José Antonio Andrés Sepúlveda. Sepúlveda later lost the land due to bankruptcy caused by fighting to uphold his land claims in court. In 1869, William Spurgeon and Ward Bradford purchased 74.27 acres of the ranch to form the city of Santa Ana. Santa Ana became the county seat of government when Orange County was formed in 1889. Rancho Santiago de Santa Ana would later become Santa Ana. Orange, Villa Park, Anaheim Hills, El Modena, Tustin, Costa Mesa, and a part of Irvine.
1853 Pio Pico adobe in 1910
Rancho Paso de Bartolo
From Wikipedia: Rancho Paso de Bartolo was given in 1835 by Governor Jose Figueroa to Juan Crispin Perez. The name refers to a San Gabriel River ford called Paso de Bartolo Viejo (Old Bartolo’s Crossing).
Initially property of the San Gabriel Mission, the Rancho Paso de Bartolo land became a part of the original 300,000-acre Rancho Los Nietos grant. After an appeal by the mission padres, Rancho Los Nietos was later reduced to 167,000-acre, and Rancho Paso de Bartolo was once again a possession of the mission. Following secularization of the missions, Rancho Paso de Bartolo was granted in 1835 to Juan Crispin Perez, a manager at the mission.
In 1843, Bernardo Guirado, a worker at the mission, acquired 876 acres of Paso de Bartolo from Perez. Later, Joaquina Ana Sepulveda, widow of Juan de Jesus Poyorena, acquired another 208 acres. In 1847, Juan Crispin Perez died leaving the rancho to his family. After the Mexican-American war, former Governor Pío Pico began purchasing pieces of the estate from the heirs of Perez, and by 1852, he acquired 8,991 acres of the rancho. The land grant was patented with 876 acres to Bernardo Guirado in 1867, 208 acres to Joaquína Sepulveda in 1881, and 8,991 acres to Pio Pico and Juan C. Perez in 1881.
Pío Pico built a home in 1853. The home was damaged by the flooding of 1867, which set the San Gabriel River to its present course, and was nearly destroyed in 1882 by flooding. The structure was completely redone into its current form, adding American-style elements into the traditional Califorino design. In 1892, Pio Pico was evicted from the property by Bernard Cohn, an American lawyer. When taking what he thought was a loan from Cohn in 1883, Pico, who could not read or write English, had conveyed the deed for the property, and courts ruled with Cohn. Pico died a pauper two years later at his daughter’s home. Rancho Paso de Bartolo would later become the cities of Montebello, Whittier, and Pico Rivera.
Rancho Cañada de La Habra
From Wikipedia: Rancho La Habra (also called “Rancho Cañada de La Habra”) was a 6,698-acre Mexican land grant given in 1839 by Governor Juan Alvarado to Mariano Reyes Roldan. The name refers to the “Pass Through the Hills”, the natural pass to the north between the Chino Hills and Puente Hills into the San Gabriel Valley, first discovered by Spanish explorers in 1769. The La Habra grant was shaped like a wedge pointed south.
California’s Mexican Governor Juan B. Alvarado awarded the land grant of 1.5 square leagues to Mariano Reyes Roldan, a 40-year-old ayuntamiento (municipal council member) of Los Angeles. Roldan named it Rancho Canada de le Habra. Roldan sold the rancho to Andrés Pico. As required by the Land Act of 1851, a claim for Rancho Paso de Bartolo was filed with the Public Land Commision in 1852. The grant was patented to Andrés Pico and Francisco de Uribe de Campo in 1872. Abel Stearns purchased the land in 1861, however, after the drought in 1863, and forced to sell. Most of the new purchasers were Basque sheep growers. Domingo Bastanchury and Jose Sansinena were partners until 1889, when Sansinena acquired a 5,000-acre sheep ranch that included most of La Habra and La Habra Heights. Jose Sansinena died in 1896. Rancho La Habra would later become the cities of La Habra and La Habra Heights.
Rancho San Joaquin
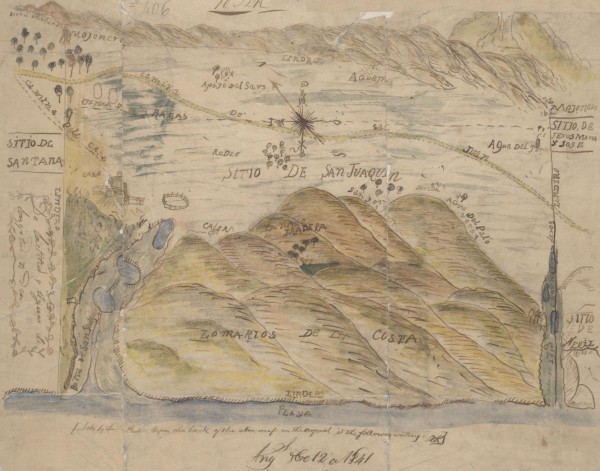
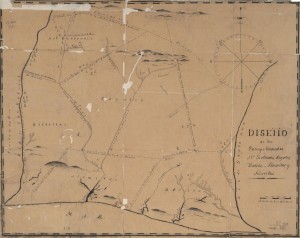
1841 Sitio (site) de San Joaquin (later Irvine Ranch)
This interesting color map of Rancho San Joaquin (before it was Irvine Ranch) shows approximately where El Camino Real went through Irvine. The map is tilted so that north is the upper left. The Camino Real crosses the southeast lindero (boundary) on the right. The lindero goes southwest into Cañon de Lagos (Canyon of Lakes, later called Laguna Canyon), to the playa (beach). The southwestern half of the rancho is the golden colored Lomarios de la Costa (Hills of the Coast, later called San Joaquin Hills). Along the top of the map are the Sierra de Santa Ana (Santa Ana Mountains), which form the northeast boundary. Shown are the aguajes (springs), and the mojoneros (corner points). Prominent on the lower left is the Boca de San Joaquin (later called Newport Bay). There are three successive lagoons illustrated, heading inland, which are lower and upper Newport Bay. The original casa is shown near where the University of California Irvine is now. At the left the Camino Real passes la Cienega de las Ranas (marsh of frogs) which is shaded blue. The royal road has to veer east to avoid the frog bog. That is why the El Camino Real (nuevo) does not go straight through Irvine to Santa Ana. During the wet season the marsh would extend from Upper Newport Bay almost all the way to Red Hill.
Rancho San Joaquin became Irvine, Tustin, Santa Ana Heights, Newport Beach, Corona del Mar, Laguna Beach

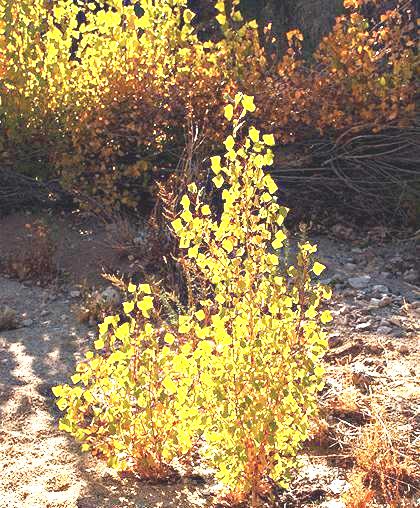
Populus Fremontii sapling in wash
Rancho Los Alamitos
This southern fragment of Rancho Los Neitos was granted to Juan Jose Nieto, son of Manuel Nieto. Where the Los Angeles River, San Gabriel River, the Rio Hondo and Coyote Creek all empty into the San Pedro Bay, are areas that flooded each year. The native Fremont cottonwood trees, also known as Alamo cottonwoods, would sprout each year in the riverbeds and grow to a few feet tall. Then the seasonal winter rains would flood the riverbeds and wash everything away. So the wide riverbeds with many small Alamo trees were given the name Los Alamitos.
Fremont Cottonwoods (Populus Fremontii) are native and very common in Southwestern USA riparian settings, where there is water below ground. In winter the leaves turn yellow, in stark contrast to surrounding golden brown or pale green trees and brush. From a distance, in winter, you can tell where water is at. Follow the ribbons of yellow to where the most Alamo cottonwoods are, then hope for an above-ground spring.
There is a rich history spanning all the periods. Read more at http://www.rancholosalamitos.com/
Rancho Los Alamitos became Los Alamitos, Seal Beach, and Long Beach
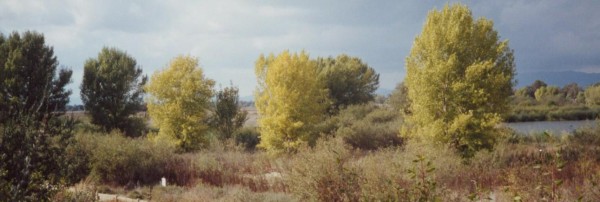
Fremont Cottonwood trees in fall/winter along the Los Angeles River
Other Ranchos of Orange County and southern L.A. County:
orange Rancho Lomas de Santiago became Irvine and some of the Cleveland National Forest
green Rancho Trabuco became Mission Viejo and Rancho Santa Margarita
grey Rancho Niguel became south Laguna Beach, Laguna Niguel, Aliso Viejo
grey Rancho Cañada de los Alisos became Lake Forest
pink Rancho Mission Viejo (never had a mission but was near one) became Ladera Ranch
orange Rancho Boca de la Playa became north San Clemente
orange Rancho Las Bolsas became Huntington Beach, Garden Grove, Westminster, Fountain Valley
yellow Rancho Cañon de Santa Ana (St. Anne Canyon) became Yorba Linda
grey Rancho La Bolsa Chica became Huntington Beach
Too many to go into details.
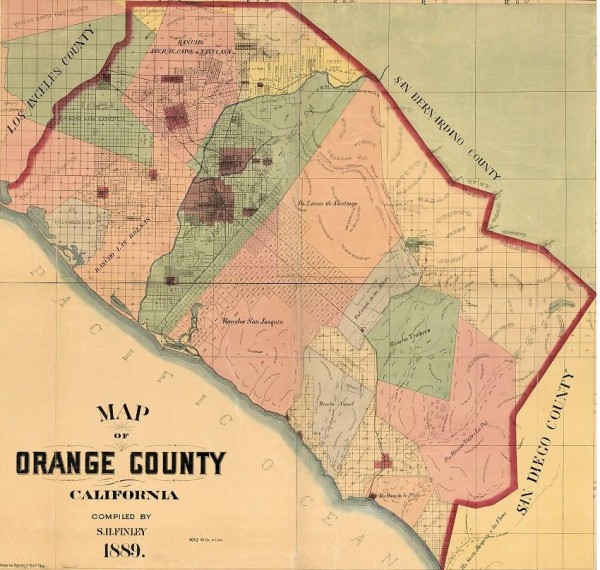
1889 (The First) Map of Orange County
Before this it was southern Los Angeles County.
1846-on American Period
Newport Boulevard
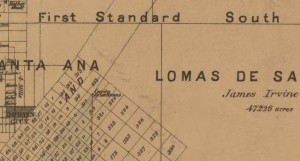
Rancho Santiago de Santa Ana is the largest and longest rancho, shaded green on the map, that extends all of the way across the county. It’s southeast boundary, with Rancho San Joaquin and Rancho Lomas de Santiago, would later become the most important line in Orange County. The line runs perpendicular to the coastline from Newport Bay to Red Hill, and then on to a certain spot on the Santa Ana River. All of the streets in central Orange County are parallel or perpendicular to that Red Hill-to-Newport Bay boundary line. Newport Blvd is parallel to the line and about a mile north. Northwest of Newport Blvd the streets are not tilted (except Anaheim) and the cites of Anaheim, Santa Ana, Tustin, Orange were developed in the 1800’s. Southeast of Newport Blvd the streets are tilted, and the land was not developed until the 1900’s. Read how Mr. James Irvine did not want his land farmed or developed. Visit Irvine Historical Society at http://irvineranchhistory.com/, or the Irvine Historical Museum at 5 San Joaquin, or the Irvine Historical Park and Library at 13042 Old Myford Rd.
Anaheim
The 1857 settlement of Anaheim was situated twenty-seven miles southeast from Los Angeles on the crossroads of wagon trails between San Pedro, San Bernardino, and Salt Lake City, and on the stage road between Los Angeles and San Diego. The boundaries were:
“Commencing at a point on said rancho where there is a stake, and which stake is 9 chains and 50 links south, 70 1/2 degrees west of the western comer of a small garden belonging to said Ontiveros, and which is situate about 3 1/4 miles westerly of the house now occupied by said Ontiveros, and running thence . . . from said point north 15 1/2 degrees west 42 chains, thence south 74 1/2 degrees west 116 chains and 50 links, thence south 15 1/2 degrees east 100 chains, thence north 74 1/2 degrees east 116 chains and 50 links, thence north 15 1/2 degrees west 58 chains to the place of beginning, and containing in all 1165 acres of land …”
The location and angle of Anaheim was chosen to make the main wagon trail from Los Angeles to San Diego go through the center of town. The location also allowed a down-sloping irrigation channel to bring water from the Santa Ana River. The nearly square boundary was originally a living fence made from thick rows of willow, with a gate on each side, to keep the cattle out. The paths around the fences eventually became the North St, South St, East St, West St of early Anaheim. There is a plaque marking the “San Pedro Gate” on the west side, that stages and horse-drawn wagons moved to and from the Port of San Pedro, or the closer Anaheim Landing in Seal Beach. Anaheim vinyardists hauled their wine several miles to the landing for shipment to San Francisco.
Here is a excerpt from “The German Settlement at Anaheim” by Dorothea Jean Paule.
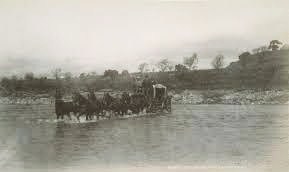
Stagecoach fording a river in the late 1800’s.
Anaheim Transportation
To transport products of Anaheim to market was a major problem. Roads in the early days were little more than wagon trails and did not allow for rapid transportation. Rivers had to be forded for lack of bridges, and there was constant danger from bandits. There was a stage carrying mail and express which passed through the colony every Tuesday from San Francisco and Los Angeles to San Diego, returning through on Saturday. There was also passenger and express service to and from San Pedro, thirty-five miles distant, on the arrival and departure of the steamer from San Francisco. This service, however, was far from adequate for shipment of viticultural produce to the main Pacific Coast port, San Francisco. Ocean travel was the only expedient means of transportation from the southern coast to the metropolis of the north. It was essential that Anaheim have a seaport, not only as a point of embarkation for products being sent to market, but also as a receiving point for goods and materials needed for the course of living in the colony.
It was very shortly after the first residents arrived at their Anaheim homes that search for a near seaport began. In the January 4, 1860, edition of the Daily Alta California, complaint was registered in a letter from an Anaheim resident of having to trade at San Pedro. “Some of our citizens are going down soon to the beach – only ten miles distant – to see whether we cannot have a port of our own. ” At one time in the quest for a port closer than San Pedro, a site fifteen miles east of the colony was examined. This location was sixty miles from San Bernardino, twenty miles from San Juan Capistrano, and thirty-five miles from El Monte. There was an estuary here of one-half mile which entered into the land for a distance of eight or ten miles. A sand spit half a mile wide ran parallel with the shore at this point. Water inside the spit and in the estuary was about twenty feet deep. A chart was made of this location and displayed in the store of J. P. Zeyn and Co. in Anaheim, and it was agreed that the Superintendent of Coast Survey should be asked to have the place examined. It was rumored that silver mines were discovered between Anaheim and San Juan Capistrano, and an agent of a company of miners who wanted to send machinery for crushing and amalgamating auriferous quartz in Bear Valley in San Bernardino County also examined this prospective port to see whether machinery could be landed there.
The Los Angeles Star on February 23, 1861, mentioned that a project for a landing on the coast about twenty miles from Anaheim was temporarily given up, but not abandoned, “as the trade to the tin mines, San Bernardino, etc. may yet render it necessary.” It is possible that this is the same location as that stated above as fifteen miles from the settlement.
A site for Anaheim’s port was ultimately selected in October, 1864, on the ocean twelve miles south of the town. The Anaheim Lighter Company was formed in the early sixties by citizens of the community for the purpose of financing this port. Each member of the company was assessed to build a and from the steamers which called at the port, one end of the cable being fastened at the warehouse and the other anchored near where the steamer would stop. Eight or ten men pulled the cable. Depth at the port was seven feet in the slough at low tide. A hard, level road was built across the twelve miles to the Landing. At last a shipping point for wine, corn, wool, and other products not only from Anaheim but also from the neighboring country was established. Freight was landed at this port for points as far distant as Salt Lake City, being taken by wagon team to San Bernardino and by pack mules from there to Salt Lake City. A record from the year 1872 shows that thirty or forty teams were making the trip daily from the Landing to Anaheim, and one day’s report mentioned seventy teams. Usually two coast steamers stopped at the Landing each week. Anaheim Landing served Los Angeles, San Bernardino, and Arizona, as well as Anaheim, for many years, but never achieved a major seaport name for itself. The Lighter Company was terminated with the coming of the railroads to Anaheim.
The Southern Pacific Railway came to Anaheim with a branch in January, 1875, its terminus there for nearly two years before it extended to Santa Ana. The community had wanted a railroad for many years, so when the Southern Pacific constructed this branch, there was great rejoicing. The editor of the Anaheim Gazette in relating the advent of the railroad wrote: … there is assured a paradise of wealth and refinement in Southern California. All praise to God, who, after years of frowning, smiled upon our land with an exceedingly gracious smile. Santa Fe built its road into Anaheim in 1887, and as a result of its depot being some distance out of town, the boom hotel, Hotel del Campo, was built and a streetcar company organized with a track down Center Street connecting the stations of the two railroads.
Just as Anaheim needed a port, it needed an irrigation system, for without irrigation there could not have been an agricultural colony at Anaheim. The colony site near the Santa Ana River was selected because of proximity of water. Procurement of water from the Santa Ana was of vital importance in the early days and continued to be important for many years in the life of Anaheim, until the population of the Santa Ana Valley became greater than the river could adequately supply.
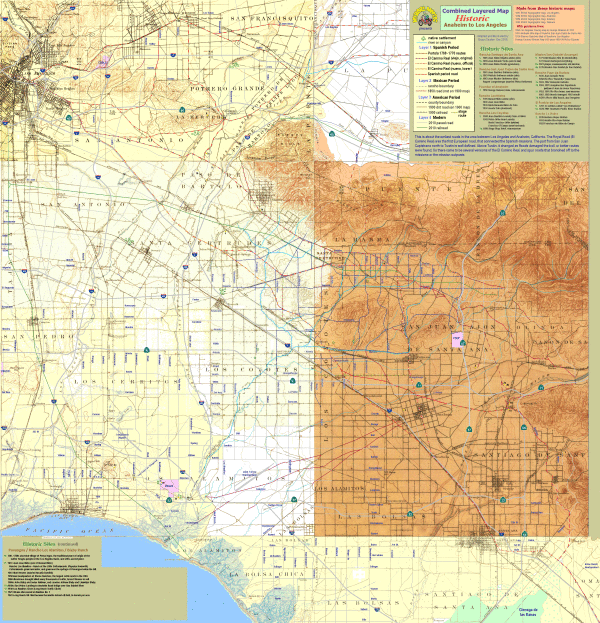
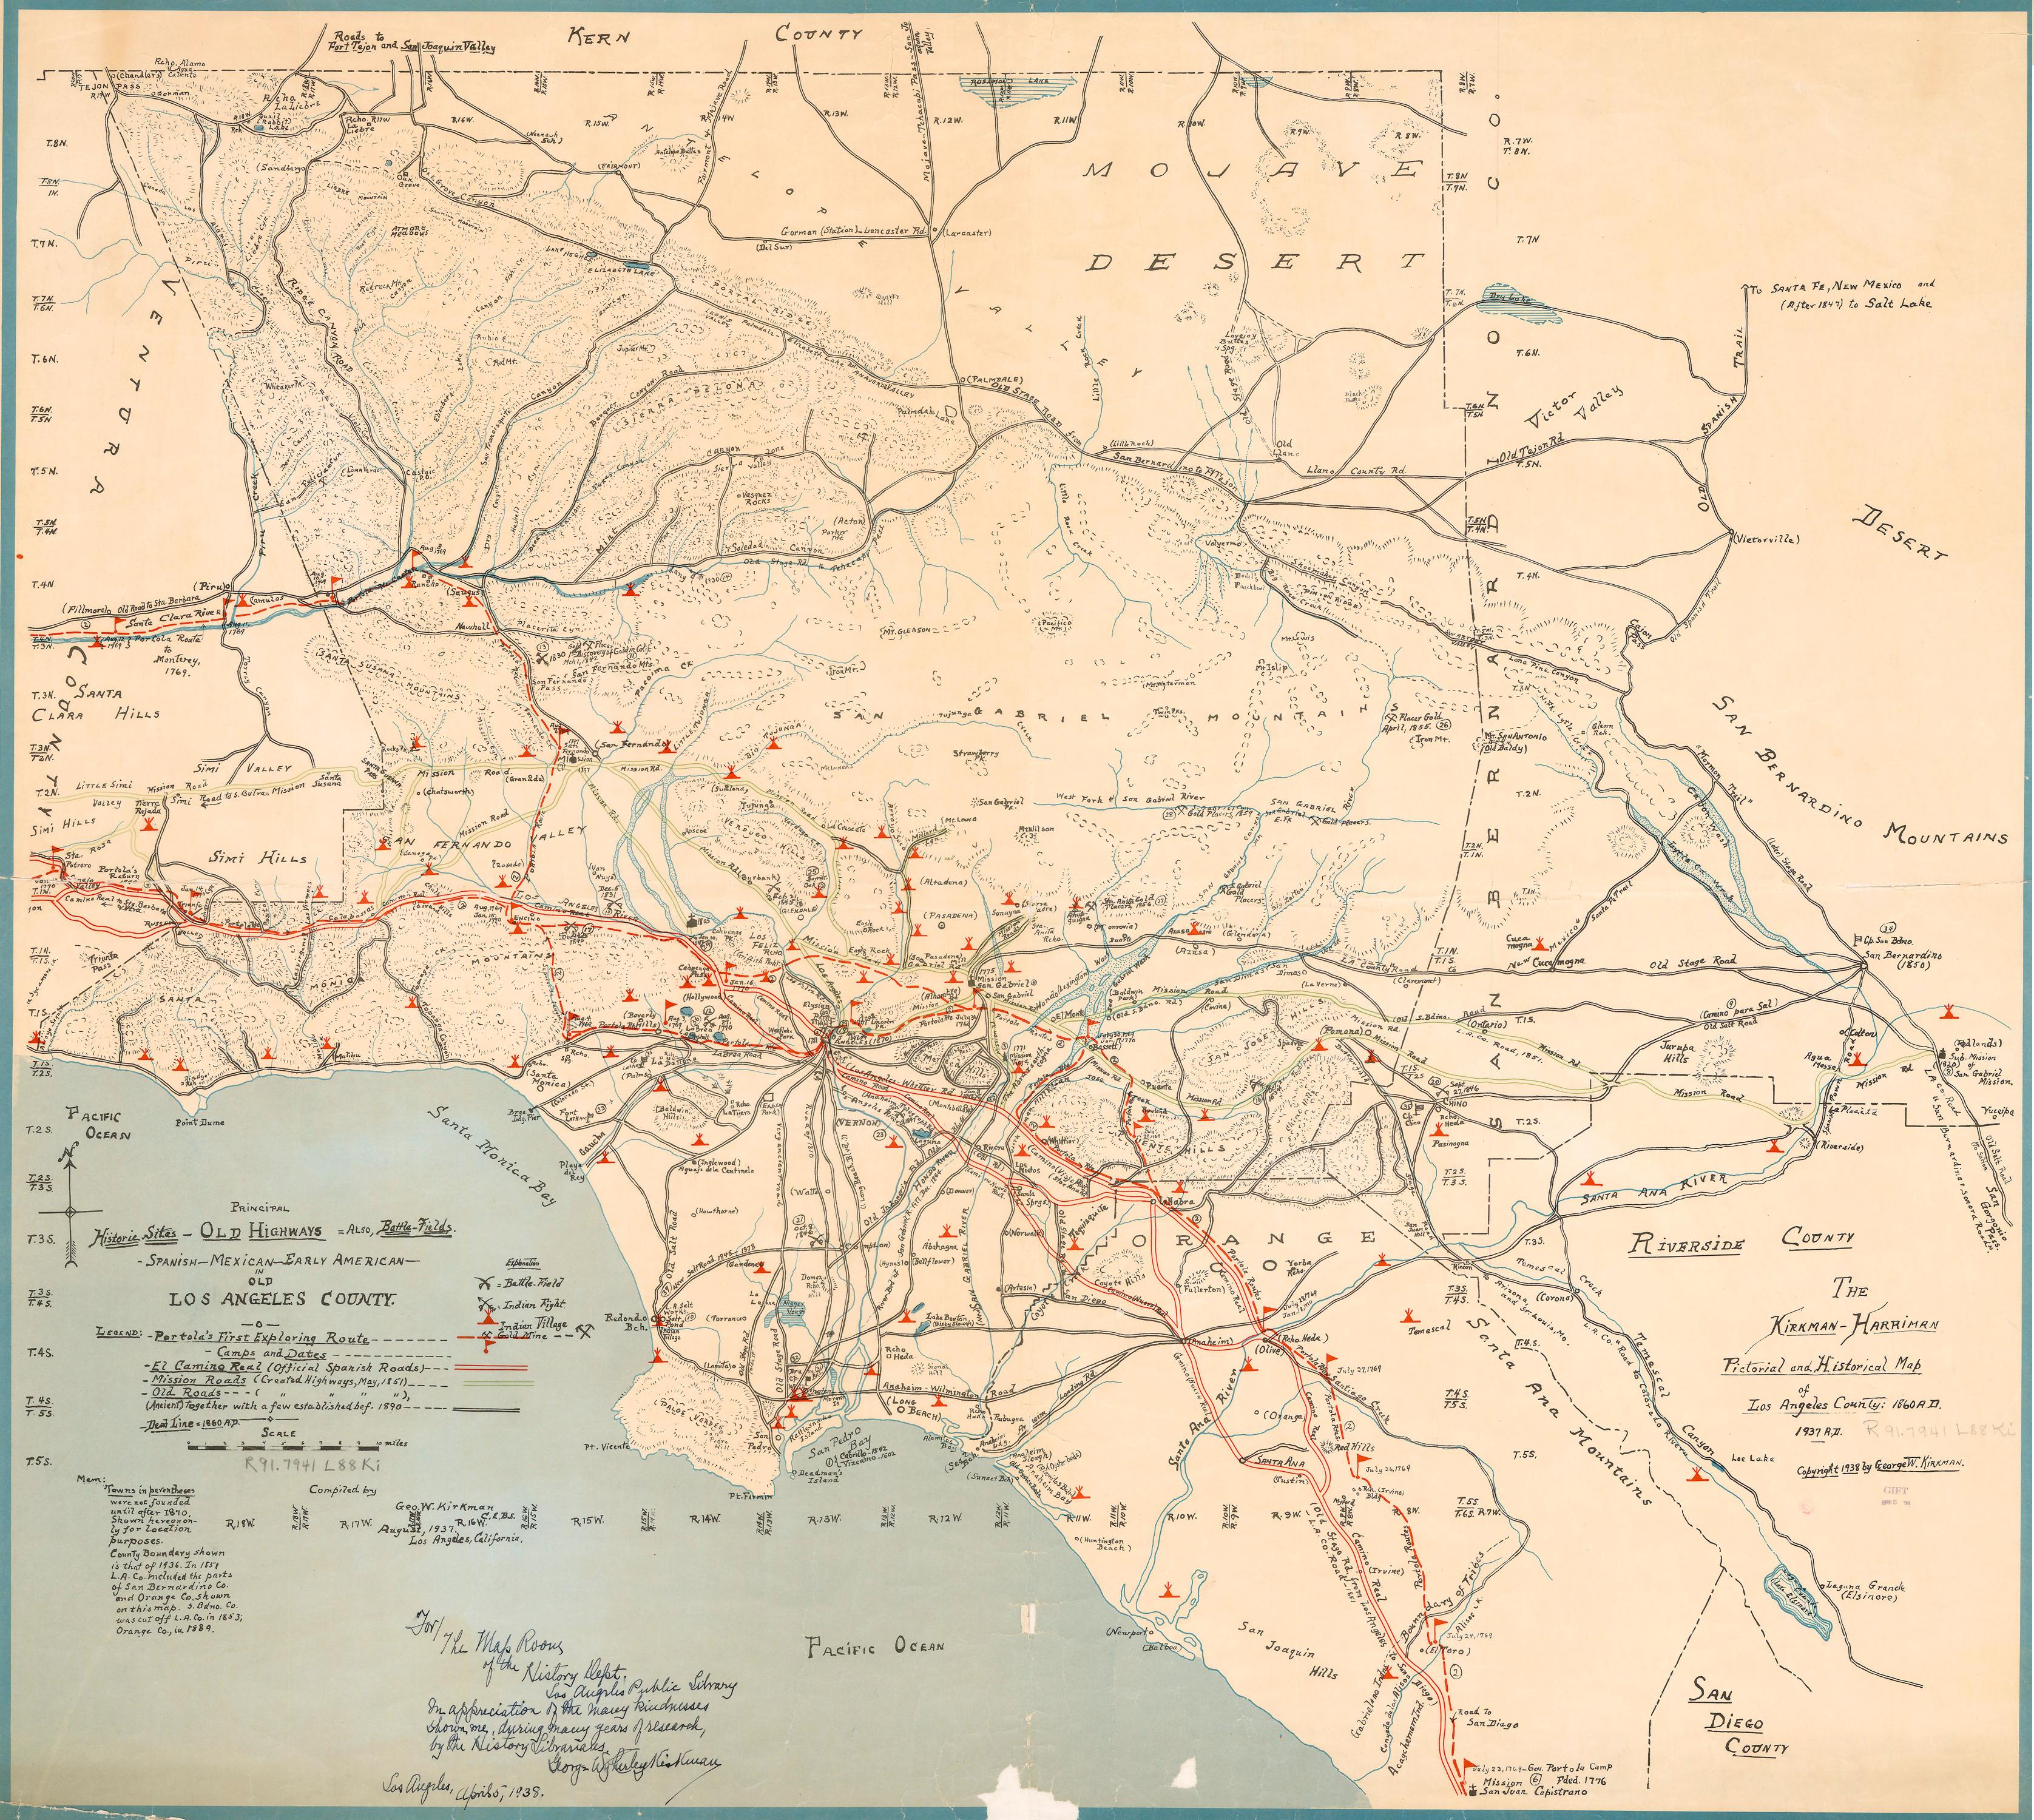
The Oldest Maps of Los Angeles
Kirkman 1860 Map of Los Angeles County
This is one of the best historical maps of Los Angeles County, compiled by George W. Kirkman in 1937. Towns in parentheses were not founded until after 1870.
- Portola’s first exploring route is shown as a thick red dashed line with flags at each campsite.
- El Camino Real (official Spanish roads) are shown as double red stripe.
- Mission roads (created before 1851) are shown as double green stripe.
- Old roads (from ancient, up to 1890) are shown as a thin double black stripe.
- Historic battle fields, Indian villages, gold mines are also shown.
- Look up your neighborhood to see what it once was, if anything besides empty land.

1860 Map of Los Angeles County
Layer 1: Earliest “layer” of Indian campsites or settlements, from before 1769.
Some Indian names lasted, like Azusa, Cucamonga, Malibu, Temescal, Topanga.
Other names did not, like Abahagna, Gaucha, Pubugna, Pasinogna, Tequisquite.
Layer 2: Over that in red is the route traveled by the Portola Expedition in 1769.
Little red flags mark the places they camped as they walked north from San Diego.
Many inland places were named that year, usually after royal or religious figures.
Layer 3: Over that are the 1770-1830 missions and connecting roads (caminos).
The Camino Real turned north in Tustin, and crossed the Santa Ana River in Olive.
Then it went northwest through Whittier. There a branch went north to San Gabriel.
Layer 4: Over that are 1830-1870 towns, stagecoach routes and wagon roads.
Anaheim-San Pedro road ran southwest to Anaheim Landing and Port of San Pedro.
Anaheim-Los Angeles road became Harbor Blvd, merging with Camino Real.
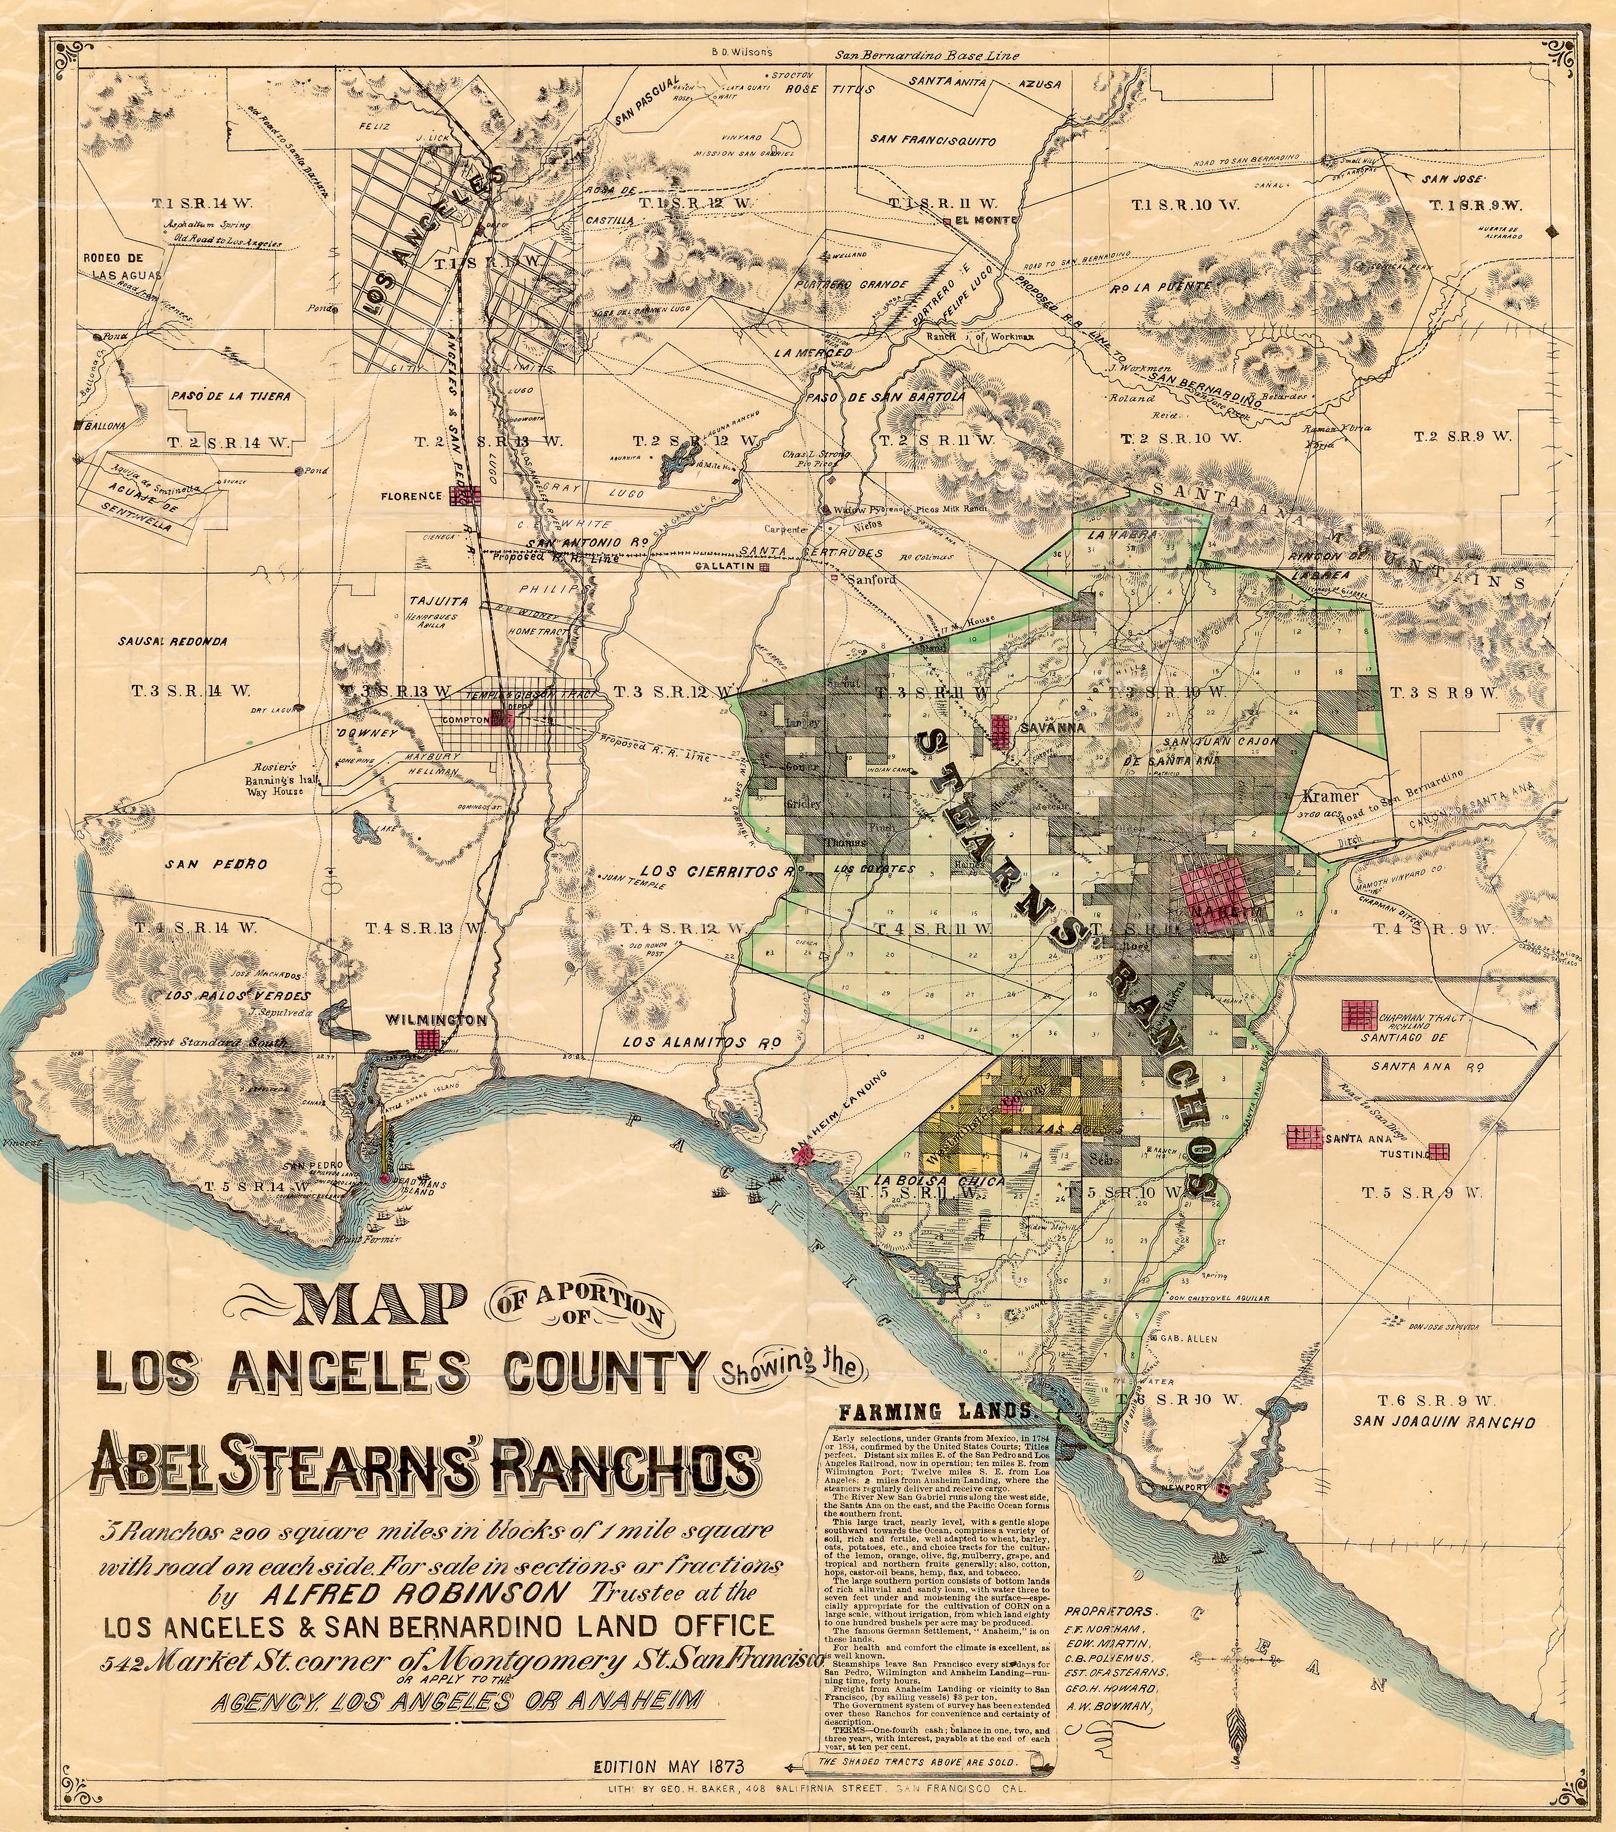
Stearn’s Ranchos Maps
Abel Stearns was born in Massachusetts in 1798, and moved to Los Angeles in 1829. He bought his first rancho, Los Alamitos, from Juan Jose Nieto in 1842. He bought more ranch land from Nieto in 1853. By the 1860’s, Abel Stearns owned much of the land in the Los Angeles basin. Besides being a cattle rancher, businessman, and land developer, Stearns was also a talented amateur surveyor and map maker. His maps were made independently, and so include certain things that other maps do not. Stearns chose to include or omit things on the map, ultimately to sell parcels of land. Having accurate, complete maps would help sell the parcels. Also helping to increase the lands value was creating a one square mile grid of access roads, orientated north and south, east and west. The property boundaries (grid lines on the map) were dirt access roads that later became the major streets of north Orange County. Some of them are still called “road”, such as Ball Rd.
One Mile Square Grid: If you are familiar with northern Orange County, California then you know how easy it is to navigate and estimate distances with the square grid of major streets spaced one mile, and minor streets spaced 1/2 mile apart. You can thank Mr. Stearns for that.
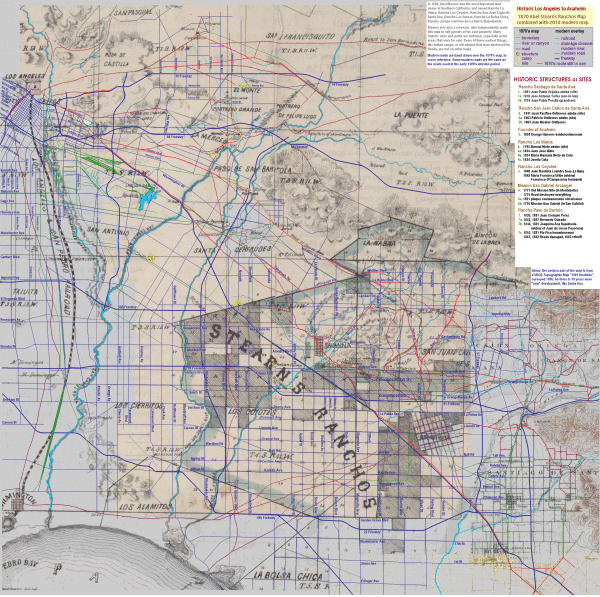
1870 Stearn’s Ranchos Map with modern streets overlay
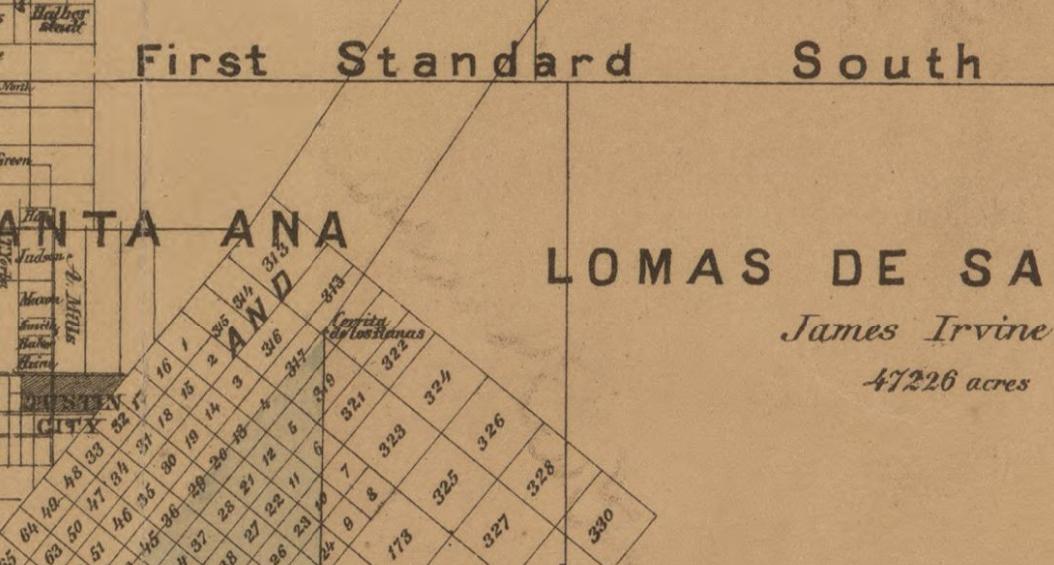
First Standard South is 2 miles north of Red Hill (Cerrita de las Ranas), a rancho corner point.
Garden Grove Blvd: Garden Grove Blvd is on a major survey line called First Standard South, which is exactly 24 miles south of the San Bernardino base line. Somehow the survey teams north and south of the line did not know or care that they disagreed with each other. The squares north of Garden Grove Blvd do not line up with those to the south. As a result, all of the north-south streets had to end, turn left, and resume a block over, at Garden Grove Blvd. Since the 1950’s most of those have been made to gently curve left where they cross, so that a non stop flow can occur, on a green light. A few have been made to curve way to the right. Other than that, everyone loves the square grid street system. Learn about ranges, townships, sections and the U.S. Rectangular Survey System here http://www.landprints.com/LpRectangularSurveySystem.htm
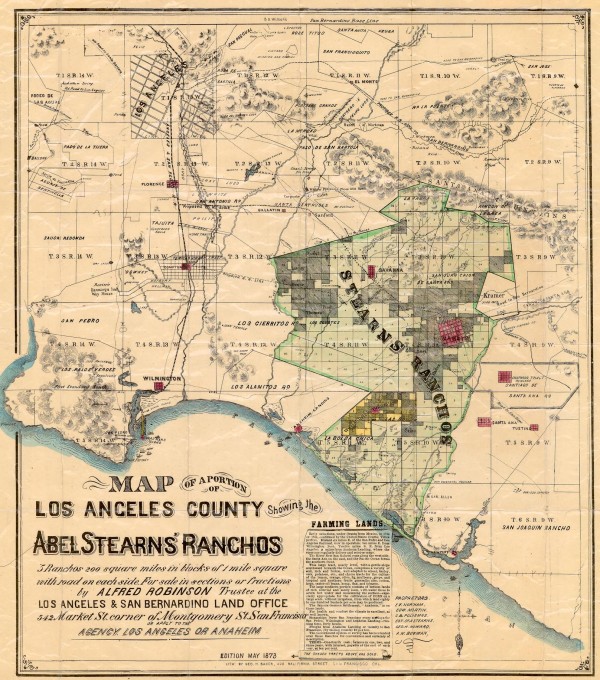
1873 Stearn’s Ranchos Map
The Horse-Drawn Wagon Roads: Whether you had a pony, a horse, a mule, an ox, a donkey, a burro, a horse drawn carriage or wagon, or a team of horses or mules pulling a carriage or wagon (the bus or big rig of the day), you took bumpy dirt roads and had to cross rivers and streams. Crossing places were chosen with hard flat bottoms. It took three days to go from Los Angeles to San Diego by stage, with two overnight stops. So going 40 miles then, averaging 5 mph, was an 8 hour trip. That was like driving 400 miles today at a 50 mph average, time-wise, but felt worse because of all the bumps. If it had rained recently then the streams would be too deep to cross. So you would not be able to go certain places, until the streams and rivers returned to normal. Only some river crossings had bridges, on well used major roads.
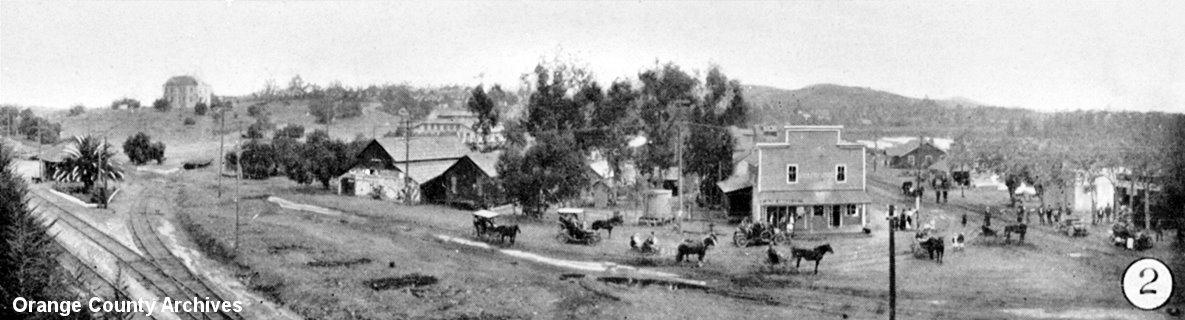
View of Olive in about 1880. Olive is the oldest non-native community in Orange County besides San Juan Capistrano.
The view is east, looking down what is now Lincoln Ave on the right, with Orange-Olive Rd crossing to the left.
In 1780 this was a junction on the El Camino Real that 100 years later became this bustling American community.
1912 Los Angeles Railway Map portion
Railroads revolutionize transportation: What a difference those perfectly flat straight and smooth steel rails make, compared with hard packed dirt, or sometimes mud or sand. Railroads came to Los Angeles in the late 1860’s. First was the north-south straight line from Los Angeles to San Pedro. More to follow about railroads and stagecoach routes…
The Oldest Maps Combined into One
This is the result: Detailed and precise early roads, combined with modern roads, on one map.
1896 LA to Anaheim combined topo
The Oldest Roads in the Area:
Portolá Routes (green dot dashed red line) The Portolá Expedition made two journeys in 1769 and 1770, looking for places for missions and settlements. Along the way they charted the land and named all of the places they saw. The routes hugged the hills and often crossed into and over the hills. The Kirkman 1860 Map above shows the Portola routes 1 and 2, and the campsites with the dates they stayed at. Most of the El Camino Real followed the Portola Routes, but not where it crossed over hills.
One can only imagine what Gaspar de Portolá, Father Crespi, and soldiers Manuel Nieto, José Antonio Yorba, Juan José Domínguez and the others were thinking as they walked. Was it easier to cross streams where the ground is sloping? Yes. Were there less swamps and marshes where the ground is sloping? Yes. Could you see distant landmarks better when on higher ground? Yes. Were you more likely to find natural resources such as edible plants and animals, minerals, wood, or even gold? Yes, if you were lucky.
El Camino Real (viejo) (purple dot dashed red line) The original 1771 camino real viejo (old royal road) stayed close to the hills. From Mission San Juan Capistrano it went first north following San Juan Creek, past Rancho Mission Viejo, Rancho Trabuco, Rancho Niguel, and then turned northwest through Rancho Cañada de los Alisos, and through Rancho San Joaquin (later Irvine Ranch) to just before Tustin.
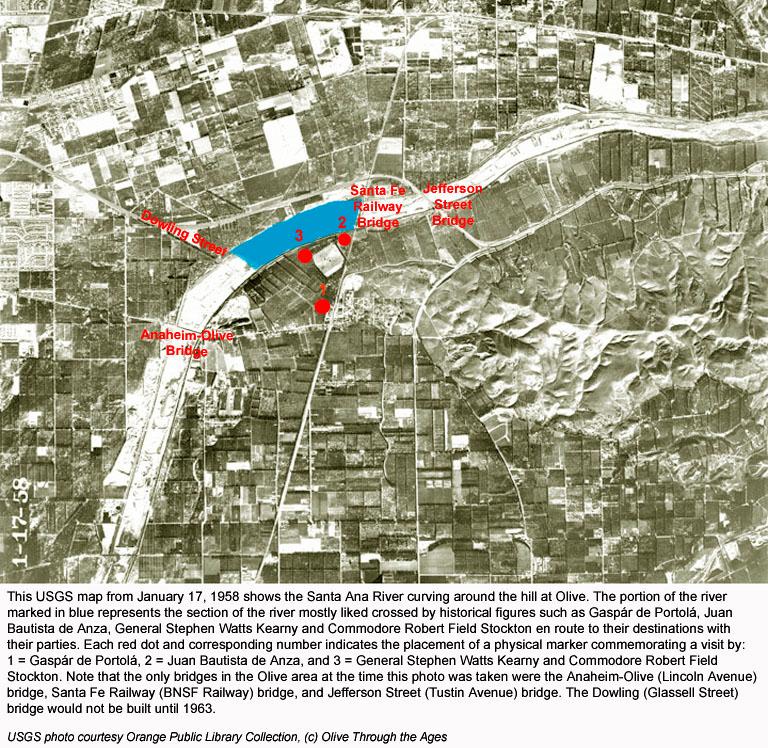
From there the ECR turns north to get around the marsh called “Cienega de las Ranas” and passes close to Red Hill. It becomes Foothill Blvd, then Old Foothill Blvd, followed by Hewes Av, passing close to El Modena (now Panorama Heights), Hewes St, through Orange, across Santiago Creek, through Villa Park, along Santiago Blvd to Olive. The “Old Santa Ana Site”, at present day Orange-Olive Rd and Lincoln Ave, is where the Yorbas and the Peraltas built their adobe homes, creating the first settlement after the founding of Mission San Juan Capistrano in 1776. The original Camino Real passed by there, and crossed the Santa Ana River at the community of Olive. It says that on the “Old Santa Ana” site marker there, shown above. Visit “Olive through the Ages” at http://dragoon1st.tripod.com/olive/menu.html.
Santa Ana River crossing
The 1770’s crossing point and route through Placentia is only estimated, with a dashed red line. The evidence for that is the “Old Santa Ana” site marker inscription, the 1855 Anaheim Site Map and 1852 Diseño of Rancho San Juan Cajon de Santa Ana, all shown above, and the graphic on the right. They show the El Camino Real (viejo) through Placentia, but not accurately. The alternate crossing point farther east upstream must have been used in the early 1800’s, because there was no trace of the 1700’s crossing and road on the earliest 1896 USGS Topographic Map. The bedrock mouth of the Santa Ana canyon held the river steady there, but further down it was free to change directions, and did after large floods. That could explain how the original river crossing place and trail segment became unused, erased and forgotten.
After crossing the Santa Ana River (originally called “Rio de los Temblores” river of earthquakes), the ECR went north through Placentia, through Rancho San Juan Cajón de Santa Ana, turning westward at Palm Dr, then skipping over Fullerton Creek to form part of Imperial Hwy, in Brea. A short piece of east-west running Lambert Rd is on the trail. Then it angles northwest through the La Habra valley, and becomes the eastern end of Whittier Blvd. This route follows the hills, but does not hug them, like the exploratory route taken by Portola. Later years would see the camino nuevo coming north up Harbor Blvd, to rejoin with the camino viejo in La Habra. Northwest through Rancho La Habra it passed by 201 E La Habra Blvd, the birthplace of La Habra. A historic marker there says “The first post office, officially naming this settlement “La Habra,” was granted in 1896 and was established in a corner of Coys Store, located on this site. El Camino Viejo, the old road between the missions, passed this corner, which became a central trading point in the fertile La Habra Valley.” Further on northwest, the trail would come to be known as Whittier Blvd, through Whittier and Pico Rivera.
After crossing the San Gabriel River (which changed course in places after floods), the ECR continues still in a northwest direction, following Whittier Blvd all the way into East Los Angeles. There Telegraph Rd used to meet Whittier Blvd. Before that it was the junction of El Camino Real (abajo) and El Camino Real (viejo). Skipping over to Boyle Heights, the trail approached “El Pueblo de Nuestra Señora la Reina de los Ángeles” (the Town of Our Lady the Queen of the Angels), along what is now Ceser E Chavez Ave. From Los Angeles the El Camino Real continued northwest along Sunset Blvd, through Hollywood and the Cahuenga Pass, along the 101 Hollywood Freeway towards Mission San Fernando.
El Camino Real (nuevo) (white dot dashed red line) Sometime, perhaps around 1775, el camino real nuevo (the new royal road) came into use. It did not stay close to the hills, like the camino viejo. In Tustin it split off from the camino viejo, and headed north-west, instead of north. It passed through what later would become Santa Ana. El Camino (nuevo) Real crossed about 4 miles downstream of El Camino Real (viejo), and then turned almost north, to pass through what later would become the centers of Anaheim and Fullerton. The new Santa Ana River crossing point allowed a straighter path from Tustin to Los Angeles that was about 3/4 the distance. It soon replaced the camino viejo.
The official El Camino Real route, in Wikipedia, is I-5 to Anaheim, Anaheim Blvd, Harbor Blvd, Whittier Blvd to Los Angeles. South of La Habra and north of Tustin, the official “El Camino Real” is not the original camino (viejo). The official “El Camino Real” is the camino (nuevo), there. In La Habra the camino nuevo merges with the camino viejo. So north of there they are the same, and the official ECR is el camino real viejo, the old royal road.
El Camino Real (nuevo abajo) (yellow dot dashed red line) Sometime, perhaps around 1780, el camino real nuevo abajo (the lower new royal road) came into use. South of Anaheim, el camino nuevo abajo splits to the northwest, from the northbound camino nuevo. This path follows a more straight line to Los Angeles, by crossing the San Gabriel River at a lower point, and just missing the southwest corner of the Coyote Hills in Buena Park. It follows the I-5 from Anaheim northwest, up to Gilbert St, then splits more north, passing under the 5-91 interchange and through Buena Park High School just north of Magnolia and Orangethorpe. Part of Dale Ave is the camino nuevo abajo, where it curves, for no reason, at the west end of the Fullerton Airport. Parts of Malvern Ave, La Mirada Blvd, and Rosecrans Ave were the trail. Further north through Santa Fe Springs, Meyer Rd and then the northern part of Telegraph Rd were the camino real (nuevo abajo).

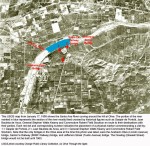
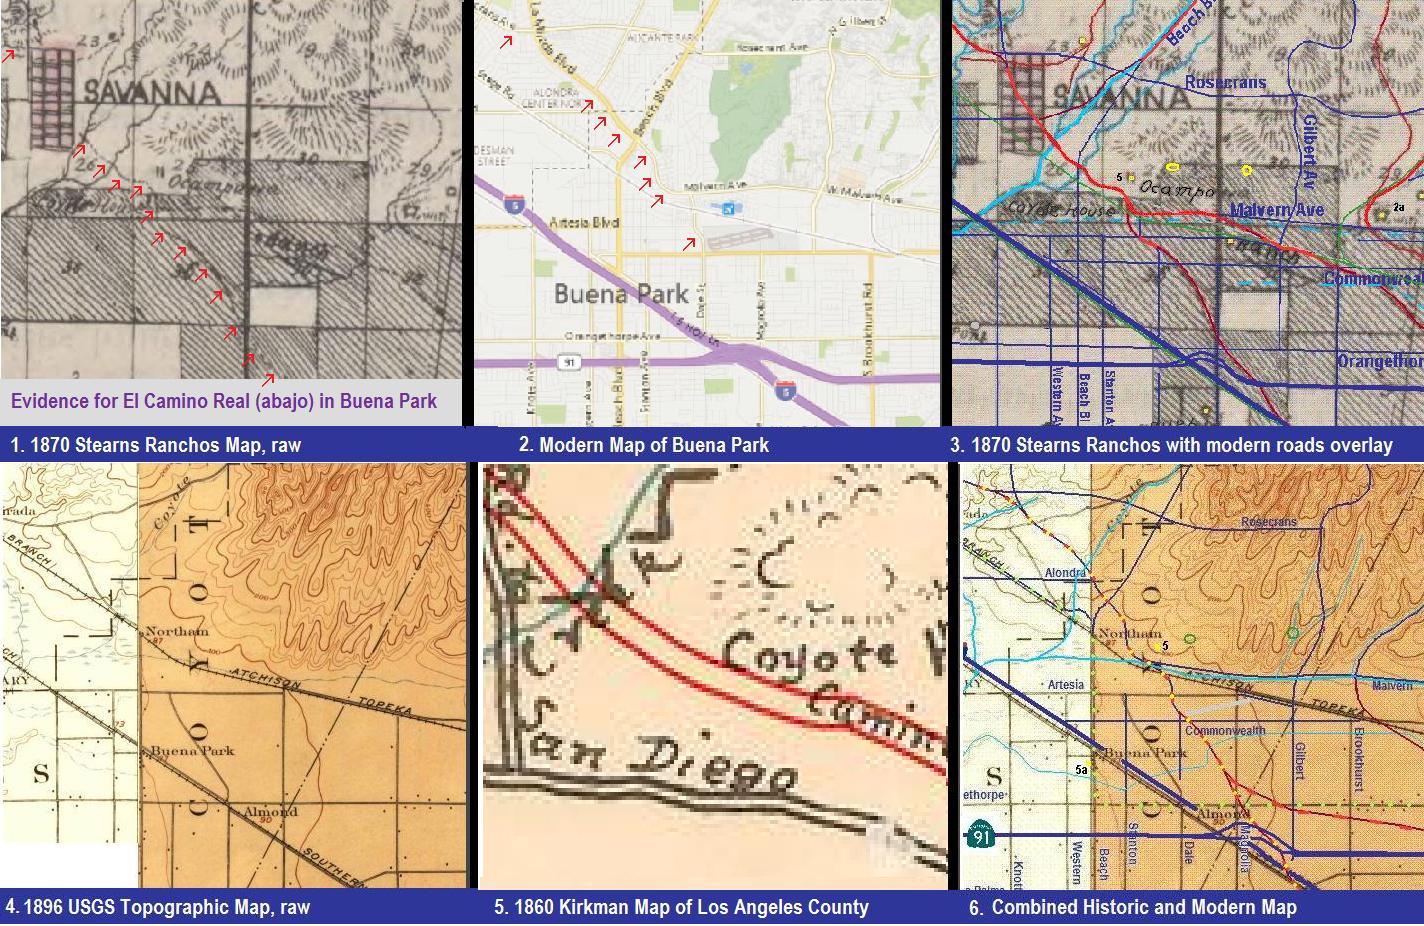
Evidence of El Camino Real (nuevo abajo) through Buena Park and La Mirada
1. 1870 Stearns Ranchos Map of Los Angeles – uniquely provides old trails, in detail
2. Modern Map – La Mirada Blvd and Malvern Ave are the old trail on the 1870 map
3. (maps 1 & 2) Combined 1870 Stearns Ranchos map with illustrated modern roads
4. 1896 USGS Topographic Map – provides accurate terrain and scale for a base map
5. 1860 Kirkman Map – provides El Camino Real versions and trails, but not accurate
6. (3, 4, 5) Combined Historic and Modern All-In-One – map 4, with 3 & 5 illustrated
The above mosaic of six small maps of the La Mirada – Buena Park area shows the process that was used throughout the large map. By comparing landmarks, maps are correlated in scale and in position. Once the known landmarks agree, then historic items can be be illustrated onto a modern map, or modern items can be drawn on a historic map. It’s like having clear sheets or layers, over a base map. Peeling back the clear sheets is literally turning the pages of history.
The camino real nuevo abajo crosses the floodplain of the San Gabriel River at Telegraph Rd, about 3 miles south of where the camino viejo crosses at Whittier Blvd. So the northern part of Telegraph Rd is older than the telegraph. Further on northwest it passes through Pico Rivera, Commerce, then East Los Angeles, where the camino abajo rejoins the camino viejo at Whittier Blvd near Gage Ave in East Los Angeles.
More historic routes to follow…
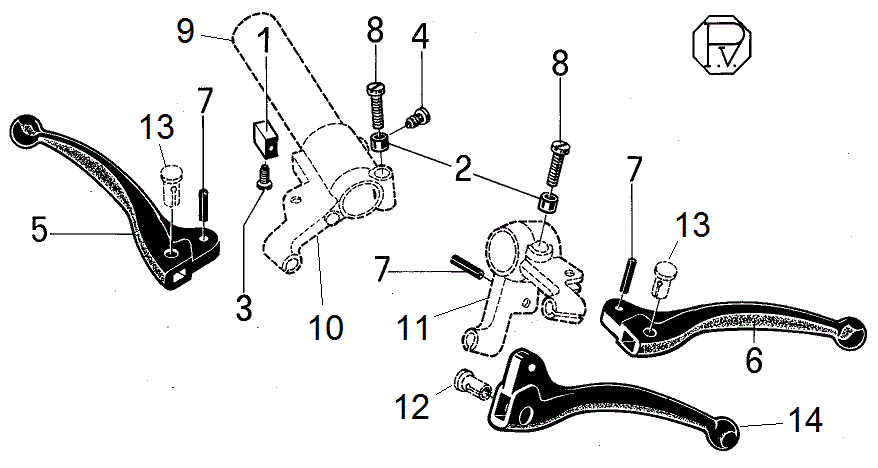
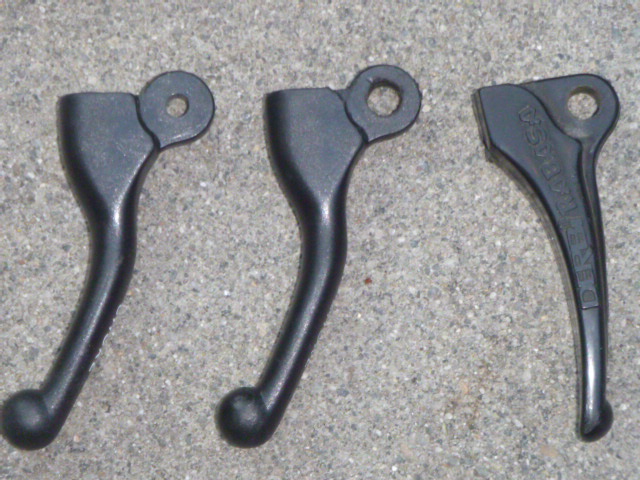
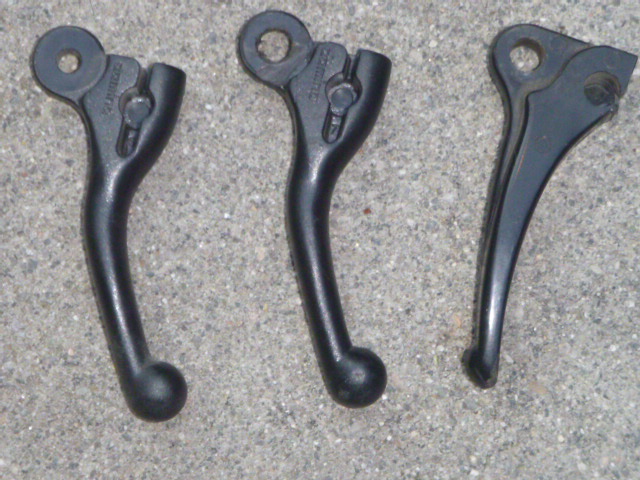
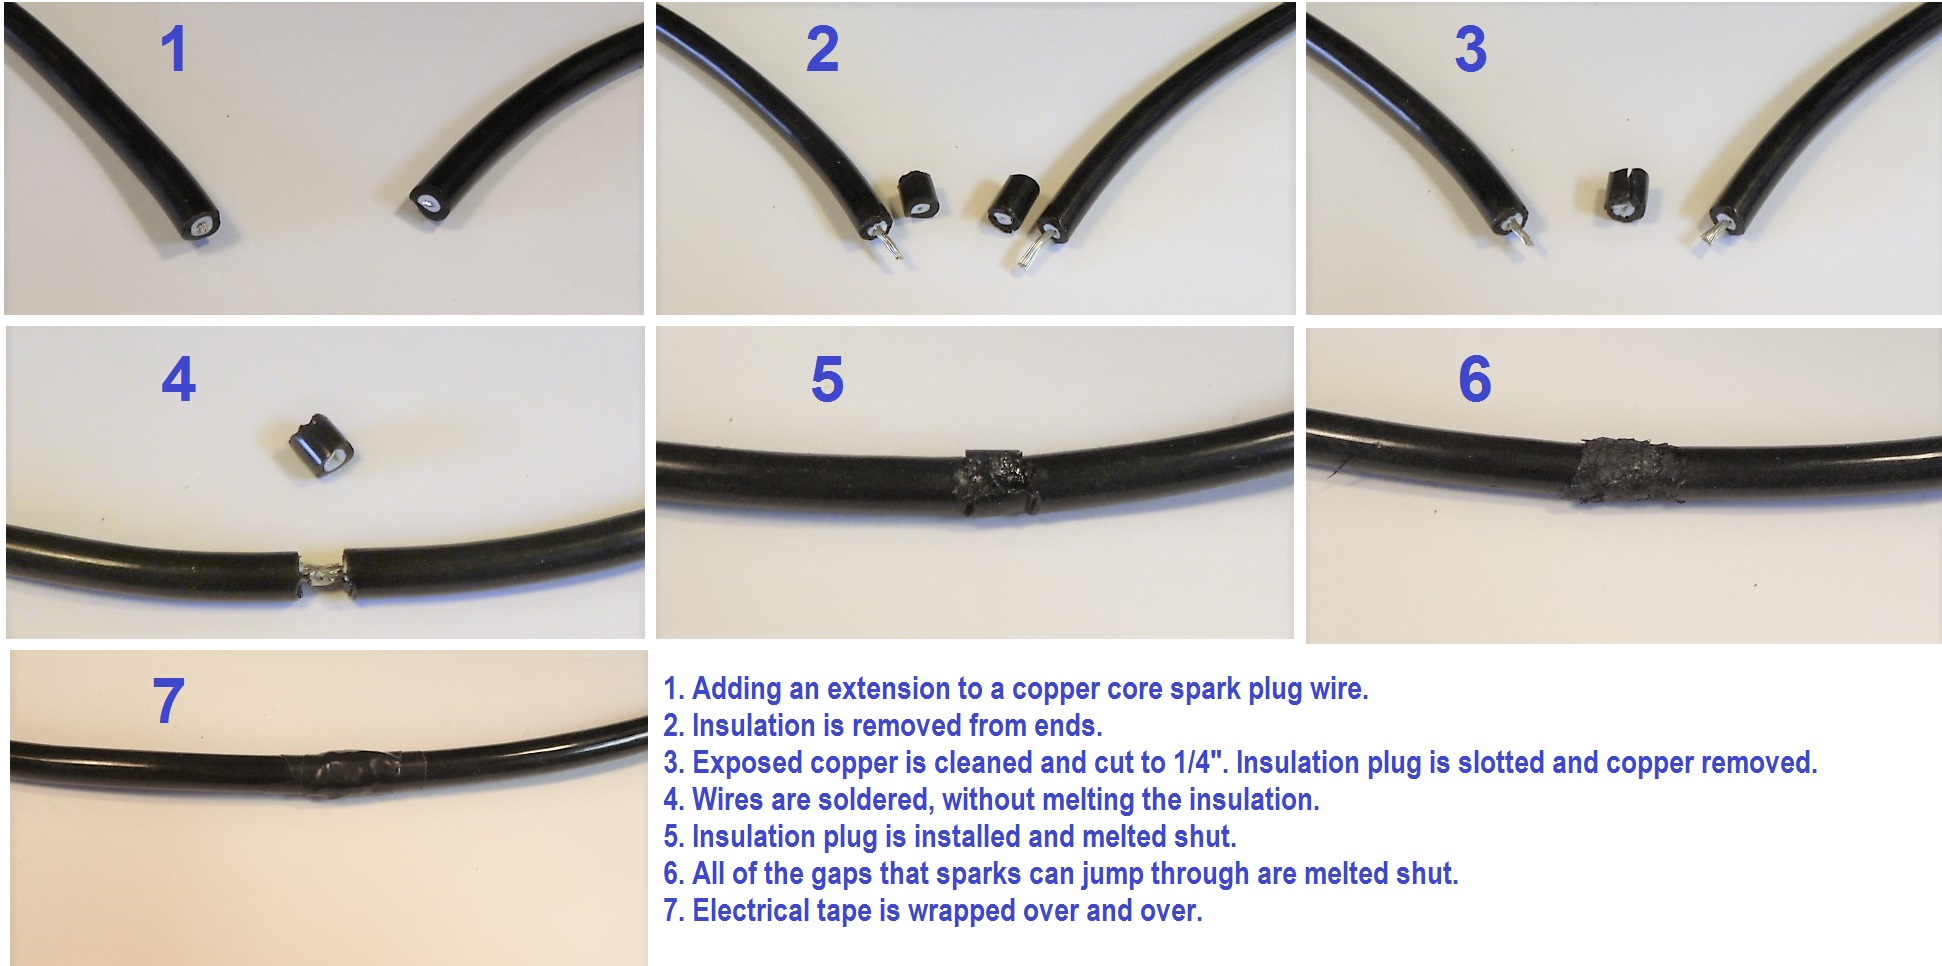
 1. 1970’s Motobecane (model 40, 50, 7)


