Contents:
1. Pinch Bolts (knarps)
2. Ends, Adapters, Misc
3. Adjusters (adjustable stops)
4. Ferrules (cable stops), End Caps
5. Bulk conduit (housing) and Wire
———- partition ———-
6. Cloth cable restoration
1. Pinch Bolts
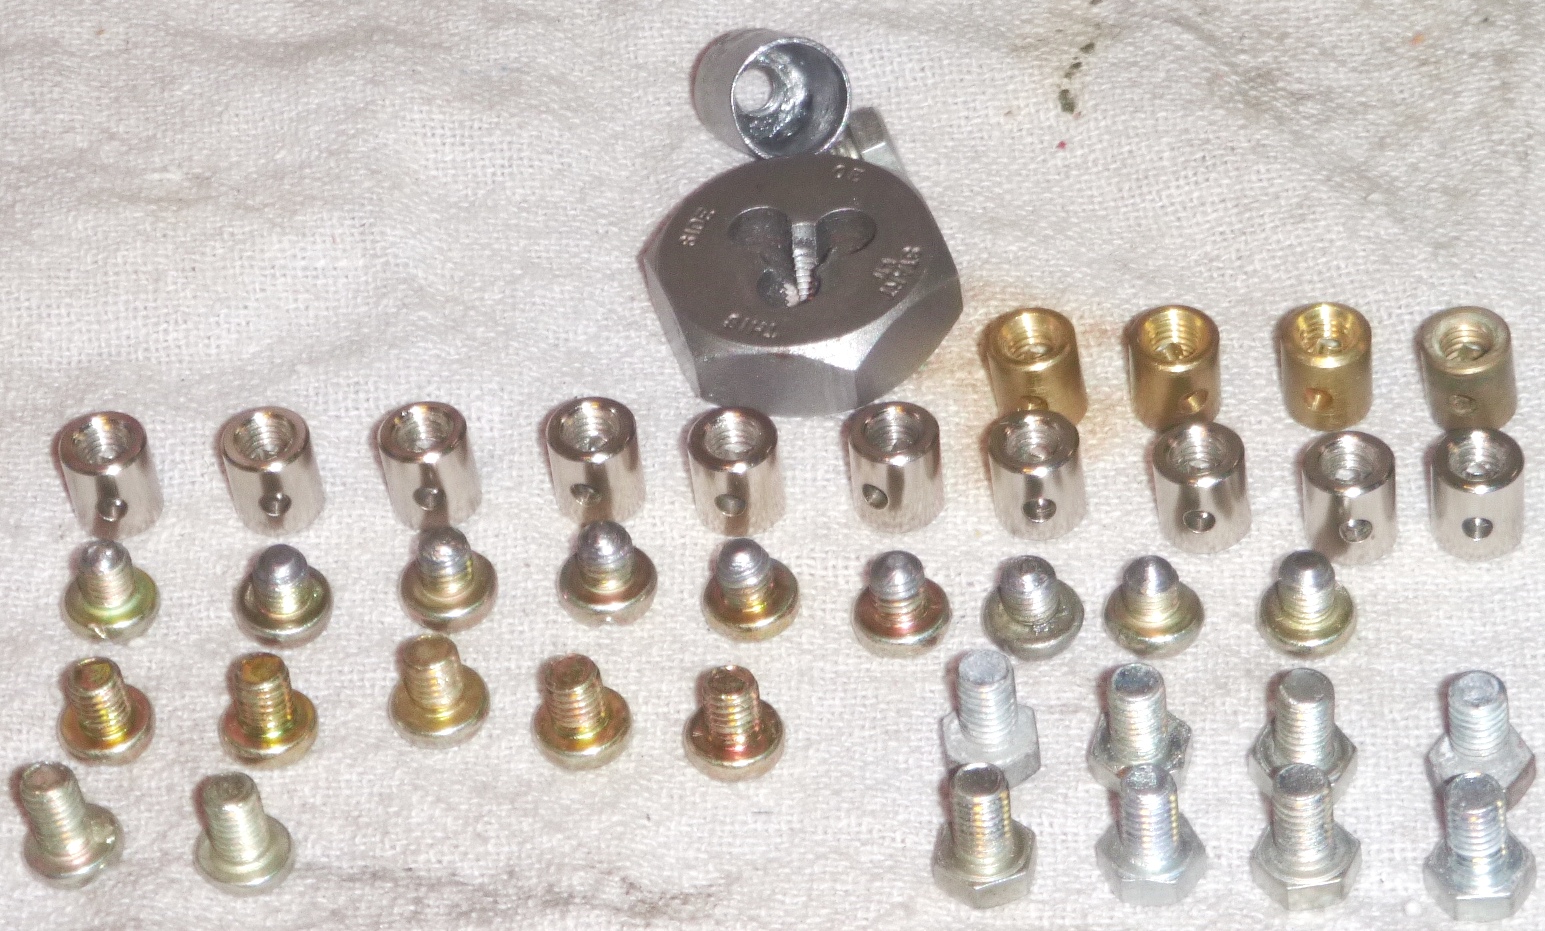
P4-P10: Barrel Pinch Bolts (Knarps)
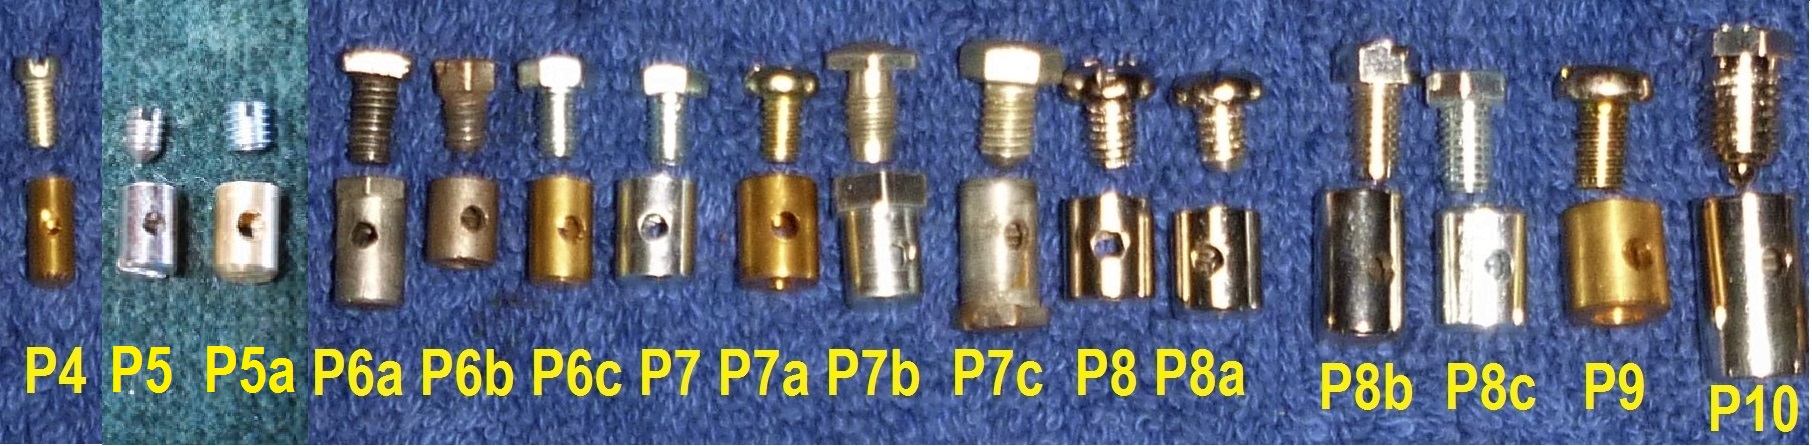
MM# price dia. len. max
MM# price dia. len. wire part# (length is without bolt)
oP4 $2.00 4.0 9.0 2.0 3548
oP5 $3.00 5.0 7.2 2.0 121-00416 for many throttles
P5a $2.00 5.5 7.5 2.0 3546 for many throttles
P6a $7.00 6.0 11 2.2 good used, MB original
P6b $7.00 6.0 8.0 2.2 good used, Peugeot original, use P6c
P6c $2.00 5.5 10 2.5
oP7 $2.00 7.0 9.0 2.5 3536
P7a $3.00 7.0 9.0 2.5 632876
P7b none 7.0 11 2.5 new, Vespa scooter original
P7c $8.00 7.0 13 2.5 good used, Peugeot original
oP8 $2.00 8.0 8.0 2.8 4906 with plain bolt (shreds easier)
P8a $4.50 8.0 8.0 2.8 49060R with bolt end rounded
P8b none 8.0 13 2.5 620-28020
P8c $2.00 8.0 11 2.5 3538
P8d $3.00 8.0 15 2.5 moped-long-knarp
P8e $3.00 8.0 12 4.0
P8f none 8.0 15 2.5 long enough for hand levers
P8g $5.00 8.0 15 2.5 long enough but no groove or lip
oP9 $4.00 9.0 9.5 3.0
P10 $5.00 9.5 16 2.5 620-28000
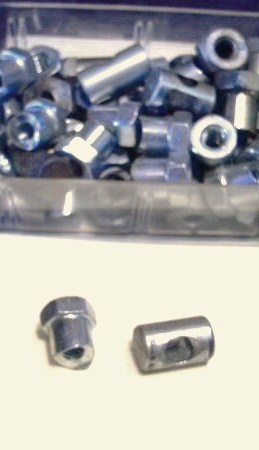
Rounded screws: Most pinch bolts have a regular screw end. But some have a domed or rounded end. Those hold better and don ‘t cut the braided wire. The rounded end folds the wire into a curve when the bolt is tightened.
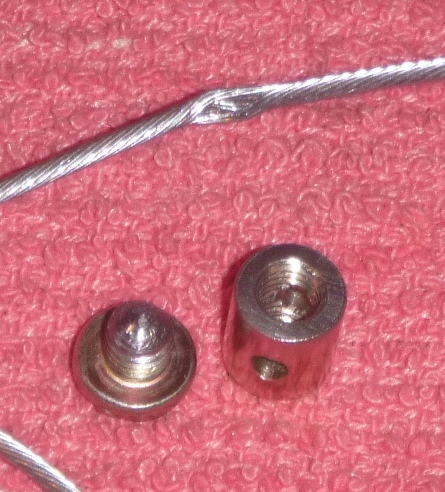
P8a rounded and P8
P20: Stepped Pinch Bolts
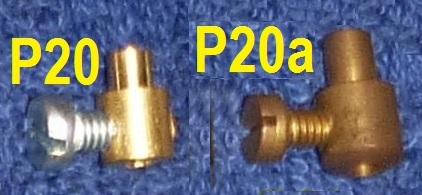
oP20 $3.00 Ø3.8 x Ø7.0 Peugeot decomp, chrome repro
P20a $4.50 Ø4.3 x Ø7.1 Barnett remake, must grind 4.3 to 3.8
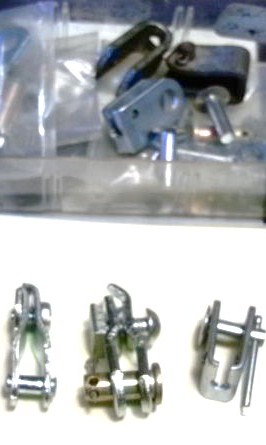
P21-P22: Loop Pinch Bolts
P21 (left) and P22
P21 (left) and P22
P21 $12.06 pieces M7 11 hex good used, Vespa, for ∅11 arch
P22 $7.50 6 pieces M6 10 hex, 74-91 Tomos, for ∅10 hole
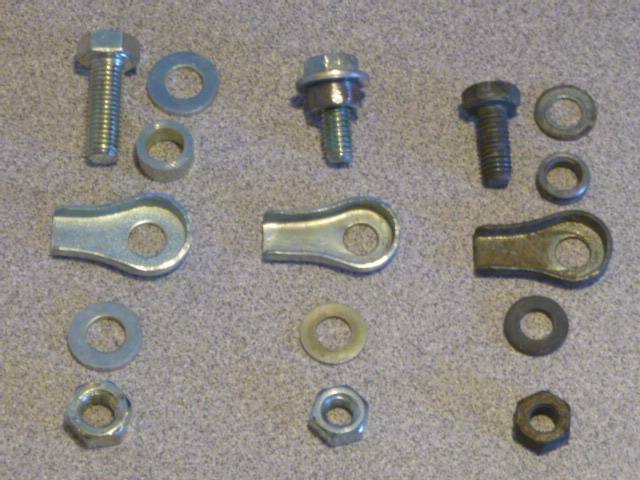
P25, P27: Flat-Sided-Hole Pinch Bolts
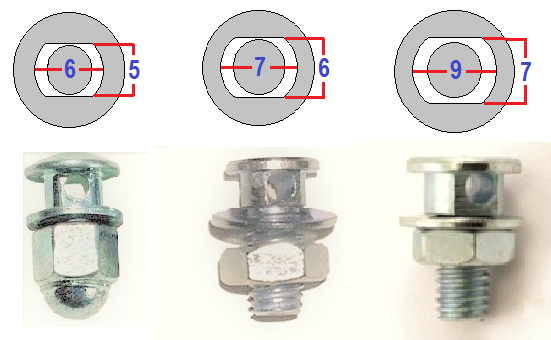
P27a 6 x 5, P27b 7 x 6, P25 9 x 7 H60 Grimeca
P27a $2.00 bicycle type Ø6 x 5, M5 thread
P27b $2.00 bicycle big, Ø7 x 6, M6 thread
oP25 $4.00 moped type Ø9 x 7, M6 thread, for Grimeca
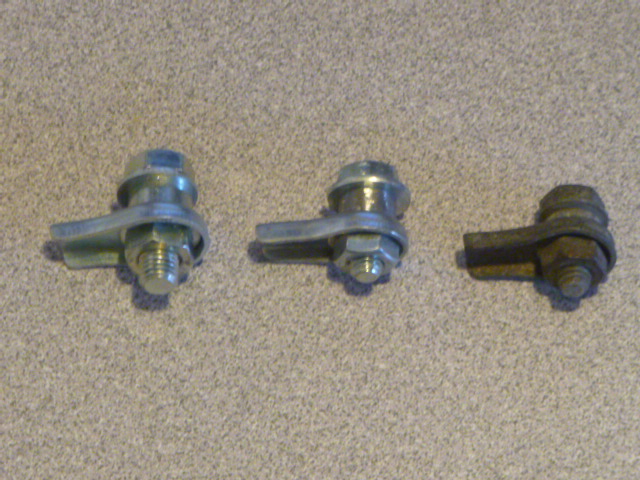
P26: Clevis Clamp Pinch Bolts
P26 a,b,c
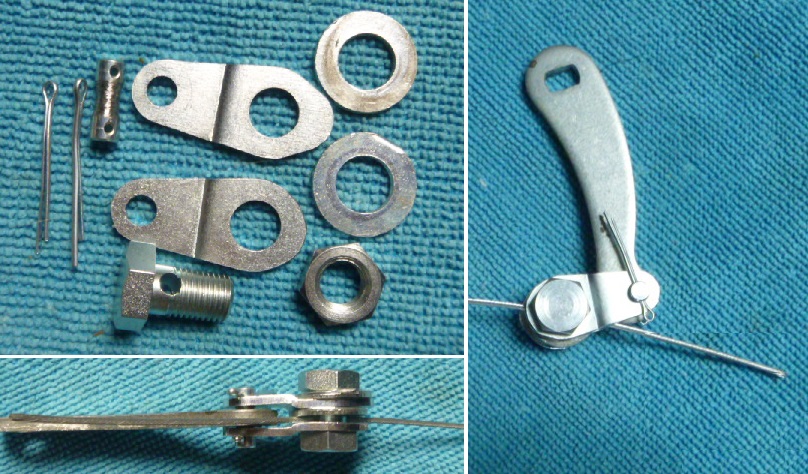
P26d heavy duty clevis clamp
P26a $17.0 original type for Hercules, AMF & KTM
P26b $10.0 clevis pinch bolt
P26c $4.00 clevis adapter
P26d $13.0 heavy duty for Hercules, AMF & KTM
2. Ends
E1: End Adapters
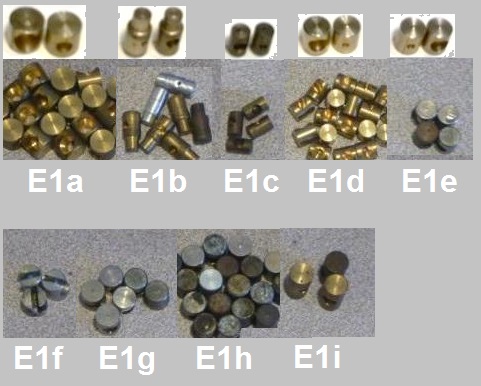
MM# price 0 part# 0 cable
E1a $2.00 25880 brake ∅6 to ∅8.7 x 8.5
E1b $6.00 Sachs start ∅3 to ∅4∅6 x 13
E1c $2.00 Barnett throt. ∅3 to ∅4.8 x 7.9
E1d $1.50 25349 throt. ∅3 to ∅6.0 x 7.0
E1e $1.50 ooooo throt. ∅3 to ∅5.9 x 4.6
E1e1 $2.00 ooooo brake ∅6 to ∅7.0 x 9.8
E1f $1.80 ooooo brake ∅6 to ∅8.0 x 8.3 side-slot
E1f1 $2.00 ooooo brake ∅6 to ∅8.0 x 10 side-slot
E1g $2.00 ooooo brake ∅5 to ∅8.0 x 10.3
E1g1 $2.00 ooooo brake ∅5 to ∅8.0 x 9.7
E1h $2.00 ooooo brake ∅6 to ∅8.0 x 9.0
E1i $2.00 ooooo brake ∅5 to ∅8.0 x 14.5
E1j $2.00 25063 throt. ∅3 to ∅4.0 x 7.4
E1k $2.00 25049 throt. ∅3 to ∅5.5 x 5.7
E1l $2.00 25062 throt. ∅3 to ∅5.7 x 5.9
E1m $2.00 23420 brake ∅6 to ∅9.0 x 9.0
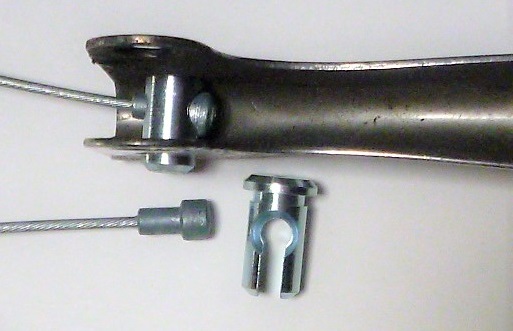
E2: End Adapters (Anchor Pins)
These are also called holdfasts and socket bolts in some parts catalogs.
Adding a washer: For the ’70’s Domino smaller left lower lever for starting, a washer is added on the replacement, for centering the cable in the hollow lever. When the cable is centered in the lever, it performs the best and does not click or shift around.
E2-DA 00 $0.0 diam length years for lever family
E2-DA 00 $1.80 ∅9.4 09.3 ’02-07 Domino Tomos 221222
E2-DA 00 $0.00 ∅0.0 00.0 ’08-17 TBS Tomos (Domino clone)
E2-D14K $3.00 ∅8.9 12.9 80’s Domino
E2-D14a $8.00 ∅7.9 13.6 70’s Domino start lever
E2-D14b $4.00 ∅7.7 15.7 D14a substitute
E2-D14 x $4.00 ∅7.7 15.7 70’s Domino (or Magura)
E2-AP 00 $4.00 ∅7.8 15.0 70’s-80’s Magura (or Domino)
E2-LA 00 $4.50 ∅7.8 17.9 ’92-08 HR Tomos 227169
E2-D14p none ∅7.8 16.0 70’s Domino (or Magura) slotted pinch bolt
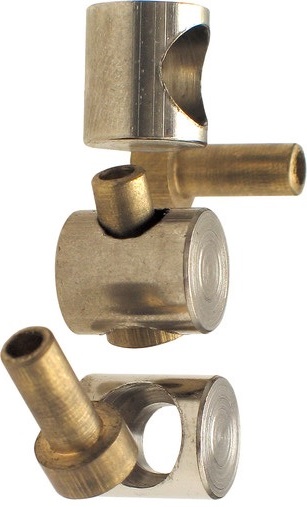
E3: Misc. Cable Items
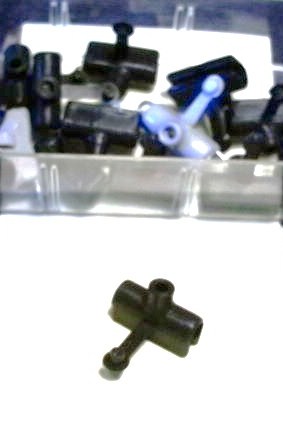
E3a, E3b
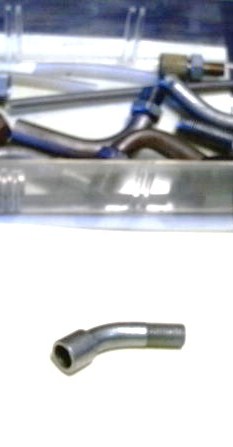
E3c elbows
E3e oiler
E3a $1.00 threaded rod nut M6, some cables have a rod end
E3b $4.00 threaded rod barrel, for a threaded rod end
E3c $0.00 elbows (cable pipes) are listed in carburetor parts
E3d $1.00 soft metal crimp on end cap, covers wire ends
E3e $2.00 in line oiler with attached cap, for oiling the cable
E4: Bicycle Ends
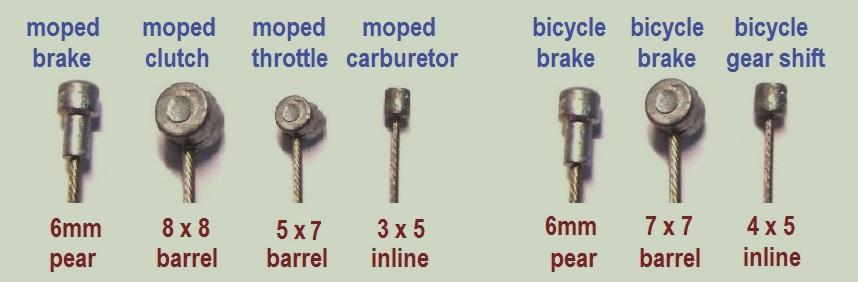
Comparison of moped and bicycle cable ends.
E4a pear ∅3.9/6 x 9 use E5s
E4b barrel ∅7.0 x 7.0
E4c inline ∅4.0 x 5.0
These bicycle cable ends are listed here to show how much different they are from motorcycle cable ends. A bicycle gear cable 4mm end could be ground down to become a motorcycle throttle cable 3mm end. A bicycle brake cable road type interchanges with a motorcycle pear or mushroom type. A bicycle brake MTB type 7mm end fits loosely into a 8 or 9mm motorcycle brake lever, but functions OK.
E5: Solder Type Ends
End E5t
(two-piece)
Wires bent into an umbrella before soldering
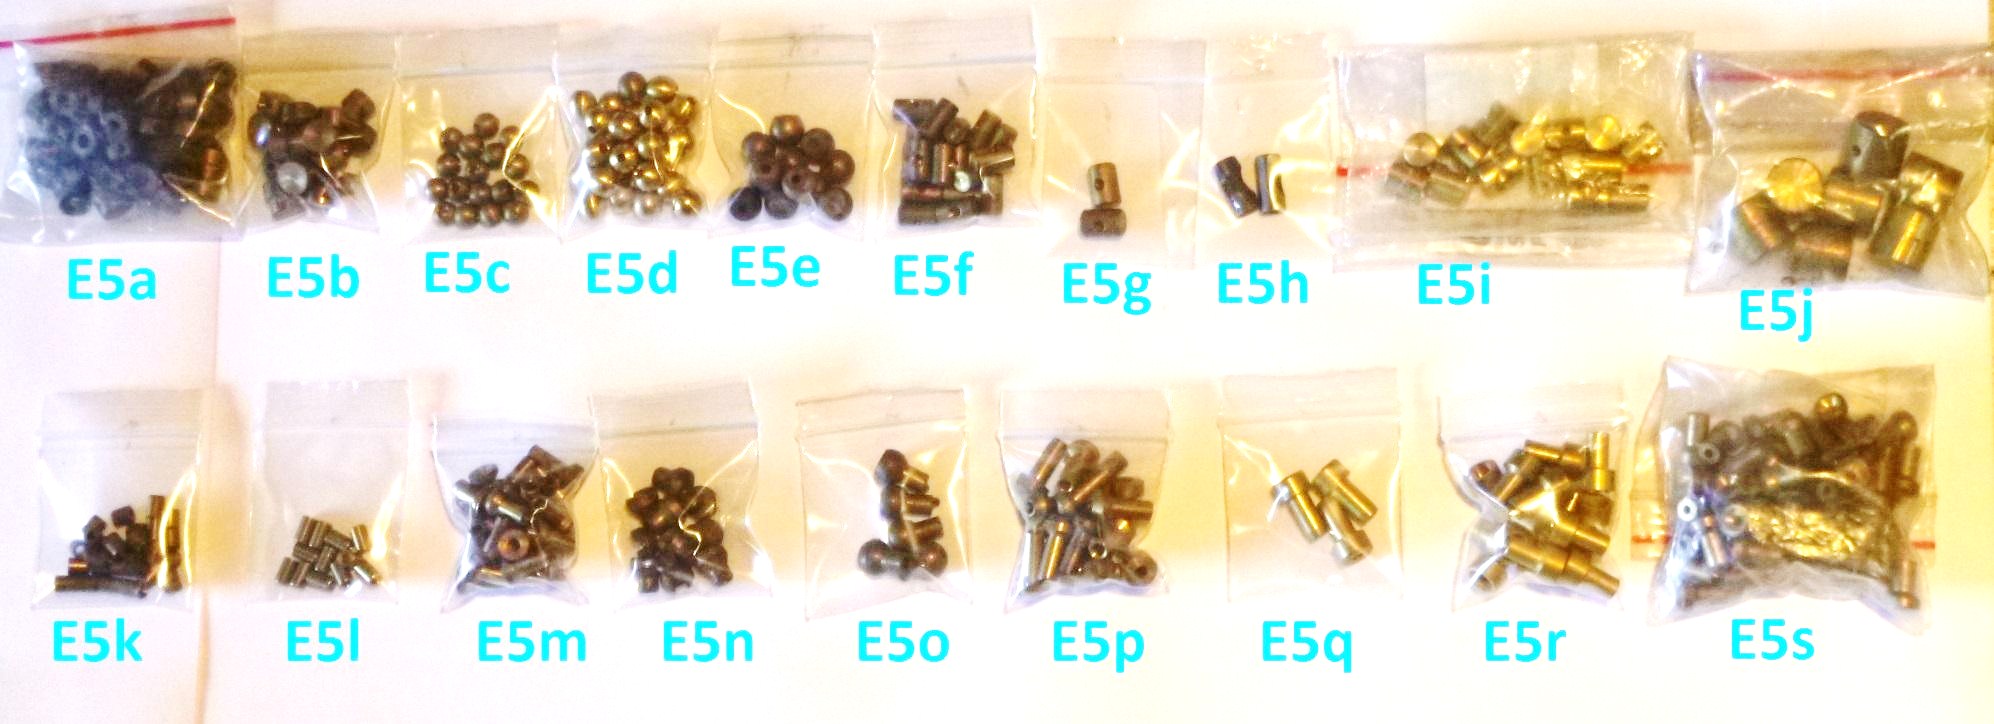
MM# price diameter length hole
E5a $0.50 000 6.0 3.0 1.7
E5b $0.50 000 5.5 3.2 1.7
E5b $0.50 000 6.3 3.3 1.6 620-25162
E5c none O00 4.6 ball 1.7 620-24187
E5d $0.50 000 5.4 ball 1.7 620-24162
E5e $1.00 000 6.3 ball 1.7 620-24062
E5f $1.00 000 3.9 7.2 1.6 620-25063
E5g none 000 4.9 7.4 1.8 000-ooooo
E5h none 000 4.6 10.2 1.4 000-ooooo
E5i $1.00 000 6.0 7.0 1.3 620-25349
E5j $1.00 000 9.5 9.5 2.0 620-25580
E5k $1.50 000 3.0 5.0 1.8 wp70-1012 for carbs
E5l none 000 3.2 3.5 1.7 620-24762
E5m$0.50 3.1/5.2 7.8 2.0
E5n $0.50 3.8/6.0 6.6 2.7
E5p $0.50 4.0/6.3 10.1 2.0
E5q $0.50 3.9/6.3 11.5 2.3 620-26298
E5s none 3.3/5.6 8.1 1.6 620-26162
E5t $2.00 000 8.0 9.0 2.0 wp70-1003
3. Adjusters
A1-A13: Screw-in Adjusters
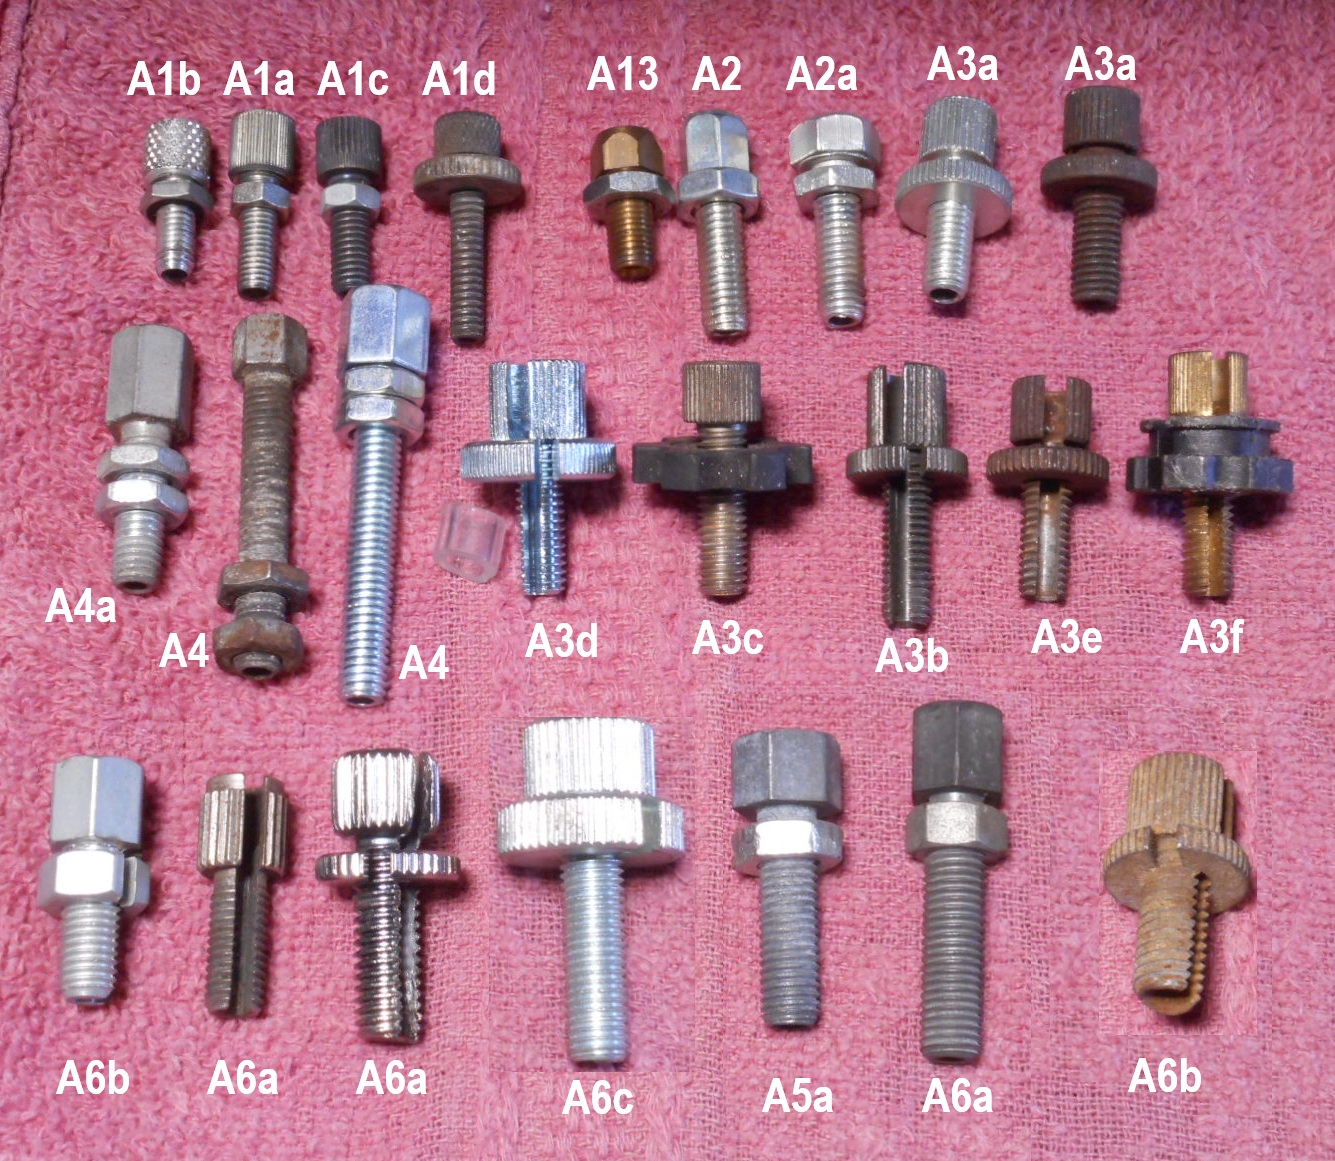
MM# price 0 thread 0 part# (with nuts unless noted)
A1a $6.00 M5-0.75 219625 for Dellorto elbow
A1b $4.00 M5-0.80 for Puch Bing elbow
A1c $5.00 M5-0.90 023089 for Motobecane
A1d $2.00 M5-1.00 very coarse, for ?
A2a $3.00 M6-1.00 hex no slot
A3a $9-$5 M6-1.00 round no slot good used
A3b $5.50 M6-1.00 222592 round slotted orig 90’s Tomos blk
A3c $4.50 M6-1.00 021222 no slot w/star nut orig Motobecane
A3d $4.00 M6-1.00 slotted shiny new, much bigger
A3d $0.00 a piece of clear fuel hose adapts it from 8 to 5 mm
oA4 $5.00 M6-1.00 hex long used
A5a $4.00 M7-1.00 hex used
A5b $5.00 M7-1.00 round slotted
A6a $5.00 M8-1.25 round slotted
A6b $5.00 M8-1.25 hex slotted short
A10 $4.00 M6-0.75 00189 without nut for Motobecane carb
A11 $4.00 1/4 – 24 aluminum
A12 $7.50 M7-1.00 short for Motobecane decomp
A13 $5.00 M6-0.75 110437 for Dellorto, Bing, Gurtner, and Asian carbs
A1, A7: Adjuster nuts
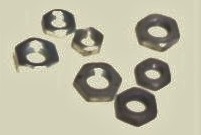
MM# price 0 thread 0 part#
A1a $3.00 M5-0.75 219626 thin nut for Dellorto elbow
A7a $1.50 M5-0.80 thin nut
A7b $1.50 M6-1.00 thin nut
A7c $2.00 M6-0.75 169227 thin nut hex 7
A7d $2.50 M6-0.75 04172 thin nut hex 9 Motobecane
A7e $1.00 M6-1.00 21157 plastic star nut Motobecane
A8-A9: Non-screw-in Adjusters
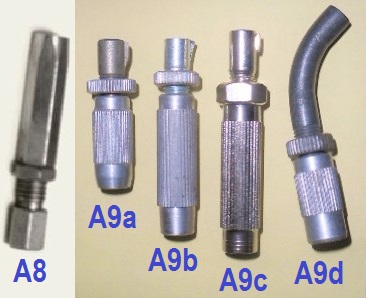
oA8 $5.00 in-line, for joining two 5 or 6mm sleeves
A9a $9.00 Magura short, good used
A9b $6.50 Magura long, good used
A9c $5.00 Magura long remake, good used
A9d $9.00 Magura short w/elbow for Kreidler
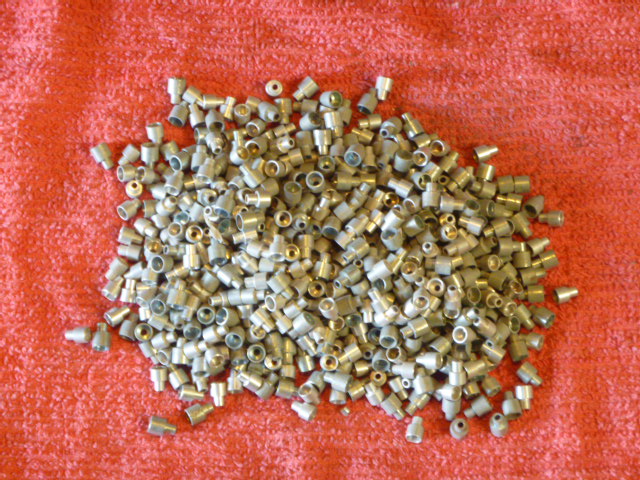
4. Ferrules
F1-F5: Step Ferrules

MM# price od1 od2 id2 length part#
F1x $3.00 5.9 8.0 5.8 13.0 15581 for MB rear brake, use F1c
F1a $3.00 5.9 8.0 5.4 10.0 43678 for Peug front brk, use F1c
F1c $1.50 4.9 8.0 6.5 12.5 3514 zinc-plated steel, shiny
F2x $2.00 4.0 7.0 5.5 11.0 16944 for Motob. decomp, use F3
F3x $0.70 4.0 7.0 5.5 10.0 zinc-plated steel, photo $3/10
F3x $0.70 4.0 7.0 5.5 10.0 aluminum
F4a $1.00 4.0 7.0 6.0 12.0 aluminum
F4b $2.00 4.5 7.7 5.8 16.7 Barnett
F4c $2.00 5.3 6.8 6.2 19.0 Barnett
F5a $2.00 5.9 11.9 10.4 15.4 Barnett
F5b $0.00 0.0 0.0 0.0 00.0 miscellaneous
F5c $0.50 7.9 12.0 6.0 12.0 bicycle brake universal
The above step ferrules all fit loosely over the cable conduit. The end cap type ferrules below fit tight on the conduit, or are crimped on by special pliers. The end caps are supposed to fit tight, for several reasons: For strength and cable performance, to help keep out dirt and water (thus increasing lifetime), and for easier servicing. Unlike the step ferrules, which are necessary, the end cap ferrules are not necessary. Sometimes conduits need to be cut and the end cap ferrule needs to be left off. The conduit will still function good without end caps, as long as the adjuster or other stop piece hole, usually 2.5mm, is not too big. Without a 6mm OD end cap ferrule, a 5mm conduit will eventually slip through an improper stop piece hole, like 4mm instead of 2.5mm. But as long as the holes in the end pieces are the proper size, the cable does not need end cap ferrules.
F6: End Caps
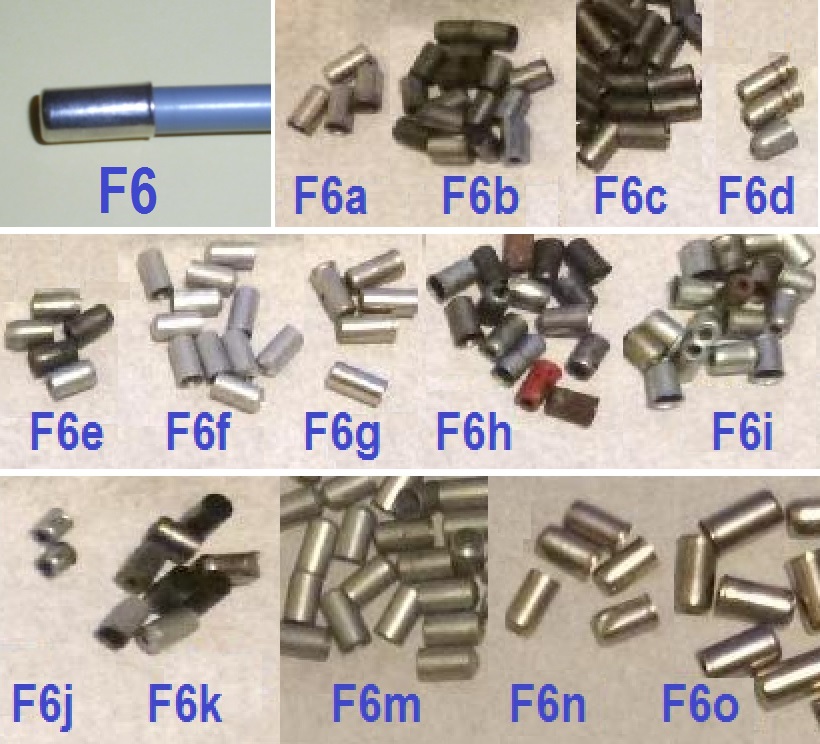
MM# price i.d.
F6a $0.50 4.8 with flare, bicycle
F6a $1.00 4.5 with flare
F6b $0.50 4.8 no flare
F6b $0.50 5.1 no flare, Barnett
F6c $0.50 4.8 no flare, Barnett
F6d $0.50 4.0 no flare Shimano SIS
F6e $0.50 4.5 no flare, Sachs
F6f $0.50 5.0 620-20100 no flare, aluminum
F6g $1.00 5.0 with flare, chrome
F6h $1.00 5.1 with flare, used orig on Peugeot, MB
F6i $1.00 5.0 with flare, Puch
F6j $1.00 5.5 with flare
F6k $0.50 6.0 no flare, Barnett
F6m $0.50 5.5 620-20110 no flare, aluminum
F6n none 6.1 with flare, chrome
F6o $1.00 7.1 with flare, chrome, too big for mopeds
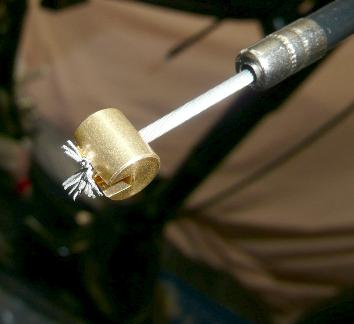
![]()
Here is a tapered punch being used to add a flare to a flareless end cap.
5. Bulk Items
B1-B6: Bulk Inner Wire
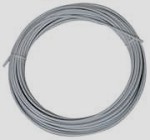
Sometimes very long cables are needed, for long bikes, or very tall handlebars, or for other things that use mechanical control cables. For 1.2mm and 1.6mm thick inner wires, up to 8 feet, it is better to use bicycle wires. beacuse they already have end(s) and cost less. The same quality 5mm conduit (housing) for bicycles costs much less than for motorcycles, and comes in colors. For thicker or longer cables, the bulk motorcycle wire and black conduit is the only choice.
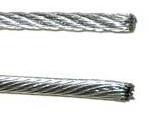
7 x 7 braid, flexible
1 x 9 braid, strong
B1 610-03080 ∅1.2 1×9 $0.80/ft stiff braid (throttle)
B1 610-03080 ∅1.2 1×9 $6.00/8.5 ft WTL w/carb end
B2 610-03090 ∅1.2 7×7 none soft braid (throttle)
B3 610-03100 ∅1.6 1×9 none stiff braid (brake)
B4 610-03110 ∅1.6 7×7 $1.00/ft soft braid (brake)
B4 610-03110 ∅1.6 7×7 $7.00/9.0 ft WRL w/pear end
B6 610-03120 ∅2.1 1×9 $1.30/ft stiff braid (brake)
B9-B18: Bulk Conduit
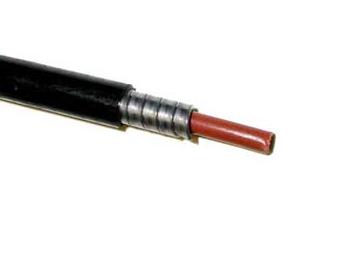
B13 black lined

B18 lt. grey lined
MM# 00 part# 0 OD x ID for
MM# 00 part# 0 OD x ID wire price /ft color
B9 610-03310 5.5 x 2.9 2.0 none /ft black
B10 610-03315 5.5 x 2.5 1.6 none /ft black, nylon-lined
B11 610-03320 6.0 x 3.3 2.5 $1.50/ft black
B12 610-03325 6.0 x 2.9 2.0 none /ft black, nylon-lined
B13 1460 0000 4.9 x 2.0 1.6 $0.60/ft black, nylon-lined
B14 1461 0000 4.9 x 2.0 1.6 $0.50/ft white, nylon-lined
B15 0000 0000 5.7 x 2.0 1.6 $0.50/ft brown lined, AMF ’80’s
B16 14427 000 4.8 x 2.0 1.6 $0.30/ft yellow
B17 14426 000 4.8 x 2.0 1.6 $0.30/ft blue
B18 14339 000 5.0 x 1.9 1.6 $0.80/ft light gray, nylon-lined
B20: Bulk Sleeve
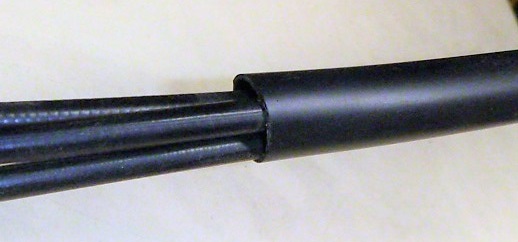
B20 1508T32 big outer sleeve 11 x 13mm black PVC
holds three 5 mm cables $1.00/ft new and flexible
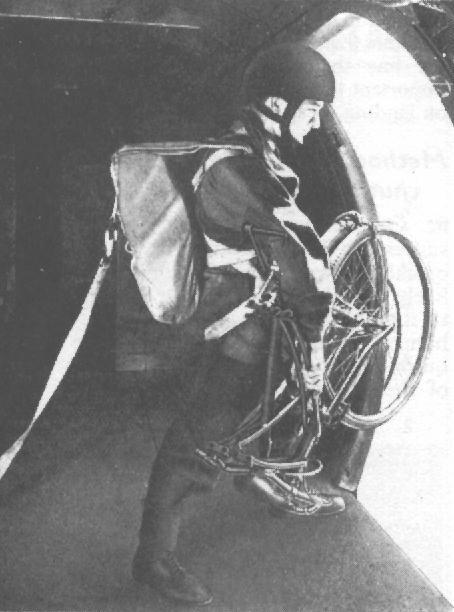
Ready to jump!
1942 BSA Airborne bike
6. Cloth Cable Restoration
Since World War II, most cable conduit is coated with soft nylon or vinyl type plastic, to be flexible and waterproof. But before the 1950’s, most cable was coated in woven cotton cloth. The same is true with electrical wires. Early 1900’s electrical wires had cloth insulation, while late 1900’s wires had soft plastic.
Modern plastic coated cables will replace the older woven types, but they do not have the old fashioned appearance. None of the normal cable suppliers, bicycle or motorcycle, sell cloth coated cables.
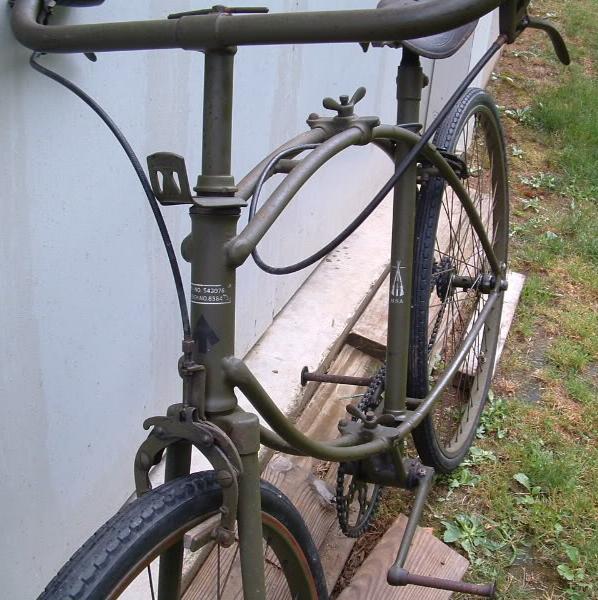
One historic old bicycle with cloth covered cables was the 1939-1945 BSA Airborne Bicycle. In WWII British commandos would jump out of planes with these bicycles and then quietly ride miles undetected to the destination.
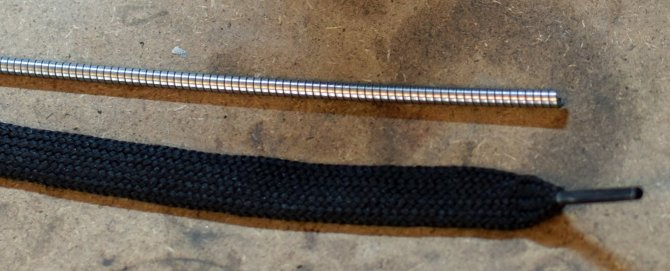
A shoelace can cover a cable
In 2014 a bike mechanic in Canada was restoring a BSA Airborne Bicycle. He ordered cable parts from Myrons Mopeds. That inspired Shaun to find a way to make cloth cables. A few days later, walking down the sidewalk, Shaun saw a purple Lakers shoelace laying on the sidewalk. It was big enough to see that it was actually a hollow tube. At that moment Shaun realized that most shoelaces are hollow tubes, in different sizes, colors, and lengths. A hollow cloth tube made from a shoelace could cover a modern cable to make it look “vintage”.
In 2015 an medical engineer in Alabama was restoring a different BSA Airborne Bicycle. He ordered cable parts from Myrons Mopeds. Shaun mentioned the idea of using shoelaces to reproduce vintage cloth cables. A few months later that person made this detailed report on how he successfully made accurate replica cloth cables out of modern plastic ones.
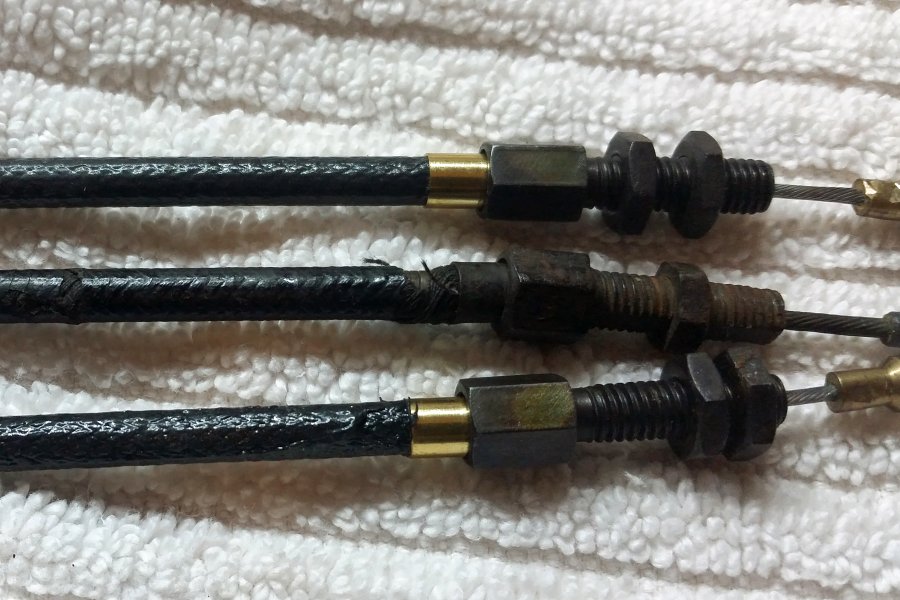
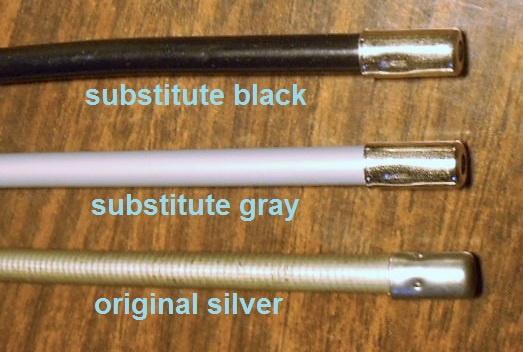
Middle is original, others are restored
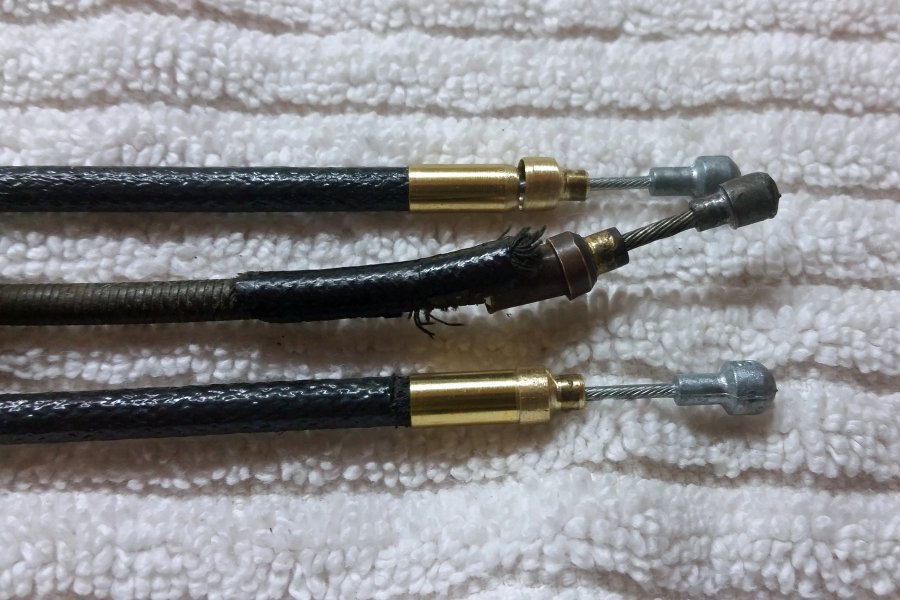
Middle is old original, others are new replicas
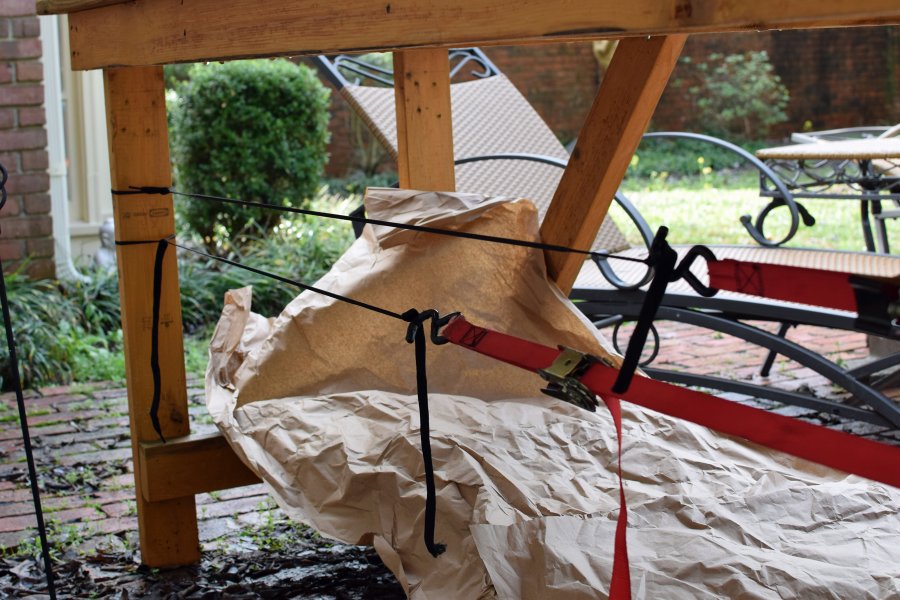
How to stretch, tighten, and bond the cloth.
9) secure one end of the shoe lace to a hook and the other end to a ratchet strap (see picture)